Disclosure: This post contains affiliate links and I will be compensated if you make a purchase after clicking through my links. Learn More
Replacing your water heater anode rod sounds intimidating. You’re dealing with a component buried inside a 40-gallon tank full of hot water. The rod has been sitting in there for years, corroding and potentially seized tight. Many homeowners pay $200 to $400 for professional replacement because they assume it’s too difficult.
The truth is different. With the right tools and technique, most homeowners can replace an anode rod in 1 to 2 hours. You don’t need plumbing expertise. You need a socket wrench, some patience, and the willingness to get a little wet.
This guide walks you through the complete process from start to finish. You’ll learn whether you need to drain your tank or can skip that step. We’ll cover the tools that make stuck rods come loose easily, including impact wrench technique. You’ll discover how to choose the right replacement rod size, what to do if your rod won’t budge, and exactly how much torque to apply during installation.
By the end, you’ll know everything needed to tackle this project confidently and add years to your water heater’s life.
Can You Replace an Anode Rod Without Draining the Tank?
Yes, you can replace an anode rod without draining your water heater. This no-drain method saves time and water. However, you need to understand the tradeoffs and proper technique.
The No-Drain Method Explained
The no-drain approach works because the anode rod opening sits at the top of your tank. When you remove the rod, water wants to flow out through the opening. However, if you work quickly and have the replacement rod ready, only 1 to 3 gallons escape.
Turn off the cold water supply valve before starting. This stops fresh water from entering the tank. Open a hot water faucet somewhere in your house. This relieves pressure in the system and slows the water flow when you remove the rod.
Speed matters with this method. Have your new anode rod unwrapped and ready before you remove the old one. Position a bucket or thick towels around the tank top to catch spillage. Once the old rod comes out, immediately thread in the new rod.
The water that does escape will be hot. Protect your hands and arms from scalding. Wear long sleeves and gloves rated for high temperatures. Safety glasses prevent hot water from splashing into your eyes.
When Full Drainage Makes More Sense
Draining your tank completely offers significant benefits. You can remove sediment that accumulates on the tank bottom. This sediment reduces heating efficiency and capacity. Flushing also gives you time to inspect the rod opening and clean any debris.
If your tank hasn’t been flushed in years, the sediment layer might be several inches thick. This buildup insulates the tank bottom from the heating element or burner. Your water heater works harder and costs more to operate.
Tanks older than 5 years with unknown maintenance history should be drained. The sediment accumulation likely needs removal. The time investment for draining adds only 30 to 45 minutes to the total job.
To drain completely, attach a garden hose to the drain valve at the tank bottom. Route the hose to a floor drain or outside location. Open the drain valve and let the tank empty. This takes 20 to 40 minutes depending on tank size.
The no-drain method takes 45 minutes to 1 hour total. The full-drain method takes 1.5 to 2 hours total but provides comprehensive maintenance. For tanks under 3 years old with regular maintenance, the no-drain method works fine. For older tanks or those with unknown history, invest the extra time in full drainage.
Understanding what an anode rod is and why it matters helps you appreciate why this maintenance task is worth doing regardless of which method you choose.
Tools and Materials You Need
Having the right tools makes anode rod replacement straightforward. Missing a critical tool turns the job into a frustrating ordeal.
Essential Tools
- 1-1/16 inch socket (most common size) or 3/4 inch socket (some models)
- Deep socket works better than standard for better hex head grip
- Ratchet wrench or breaker bar (minimum 18 inches long for leverage)
- Impact wrench (cordless with 300+ foot-pounds breakaway torque highly recommended)
- Impact-rated sockets (black oxide, never chrome sockets with impact tools)
- Bucket or large towels to catch water spillage
- Penetrating oil (WD-40, PB Blaster) applied 24 to 48 hours before starting
- Flashlight or work light for dark basement or garage locations
- Work gloves (heat-resistant rated to 200°F)
- Safety glasses for eye protection
Required Materials
- Replacement anode rod in correct length, diameter, and thread size
- Pipe thread sealant (Teflon tape or pipe dope paste)
- Garden hose (if doing full tank flush)
Our buying guide on choosing the best anode rod material explains which materials work best for your water conditions.
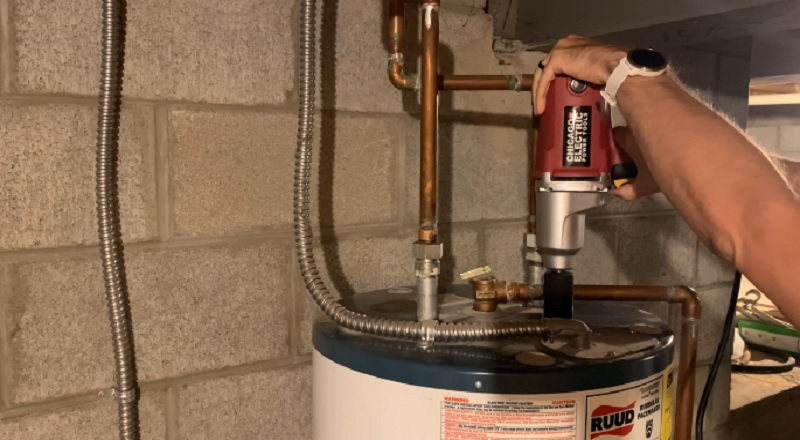
Can I Use an Impact Wrench to Remove an Anode Rod?
Yes, and an impact wrench is highly recommended. This tool dramatically increases your success rate with stuck rods.
Anode rods sit in hot water for years. Corrosion welds the threads to the tank opening. Mineral deposits from hard water cement the connection. Thread sealant applied during original installation cures into a rock-hard barrier.
An impact wrench applies rotational force through rapid hammering blows. Each impact delivers a shock to the seized threads. This hammering action breaks corrosion bonds that resist steady pressure from breaker bars. The process typically takes 5 to 15 seconds of actual operation.
Proper Technique
Attach an impact-rated socket to your impact wrench. Verify the socket size matches your anode rod’s hex head. Set the tool to reverse rotation for loosening.
Position the socket squarely on the hex head with full engagement. Apply the impact wrench in short 1 to 2 second bursts. Check whether the rod moved after each burst. Start at medium power settings and increase gradually if needed.
Once the rod breaks free and begins turning, switch to hand tools for final removal. Never use impact wrenches for installation. The hammering force can crack your tank top or strip threads. Always hand-tighten new rods, then use a manual wrench for final torque.
Manual Alternatives
A breaker bar with cheater pipe provides the most leverage if you don’t have an impact wrench. Slip a 2-foot steel pipe over your breaker bar handle. Apply steady, increasing pressure rather than sudden jerks.
Two-person technique improves results. One person stabilizes the tank while the other operates the breaker bar. This prevents tank rotation.
Heat application can help break corrosion bonds on gas water heaters. Use a propane torch to heat the hex head for 30 seconds. Never heat electric water heaters due to nearby wiring.
Extended penetrating oil soak time helps stubborn rods. Apply oil and wait 48 to 72 hours before attempting removal. Reapply every 12 hours.
Recognizing bad anode rod symptoms early means you can replace the rod before it becomes severely stuck, making removal much easier.
How Do I Choose the Right Size Anode Rod?
Selecting the correct anode rod size ensures proper fit and maximum protection.
Measuring Length Requirements
Length is the most critical dimension. Standard residential lengths are 42 inches and 44 inches for 40-gallon and 50-gallon tanks. Smaller 30-gallon tanks typically use 20-inch rods. Larger 75-gallon and 80-gallon tanks use 44-inch rods.
Measure from the threads to the bottom tip of your existing rod. This gives you the exact length needed. Measure clearance above your tank if you haven’t removed the old rod yet. You need the rod length plus 6 inches of clearance for removal.
Can You Cut an Anode Rod to Fit?
Never cut a standard rigid anode rod. Cutting exposes the steel core wire without protective reactive metal at the cut end. The exposed core corrodes rapidly and defeats the rod’s purpose. Cutting also reduces the total amount of protective material by 15% to 25%.
Rigid rods are designed as complete units with sealed ends. The manufacturing process ensures the reactive metal completely covers the core wire except at the threaded connection. Any modification compromises this design.
Flexible Anode Rods for Clearance Problems
Flexible anode rods solve low-clearance situations properly. These segmented designs use hinged connections between sections. The rod bends during installation and removal, requiring only 18 to 24 inches of clearance.
Once inside the tank, the flexible rod hangs straight like a rigid rod. The hinged sections don’t affect protective capacity. The same aluminum or magnesium material provides cathodic protection.
Flexible rods allow length customization through segment removal. Each segment typically measures 6 to 8 inches. Remove one or two segments to shorten the total length. The end segments have sealed tips preventing core wire exposure.
Flexible rods cost $50 to $75 compared to $25 to $50 for rigid rods. The premium pays for the complex manufacturing.
Diameter and Thread Size
Rod diameter typically measures 0.75 inches or 0.84 inches. The thicker 0.84-inch diameter provides more protective material and longer service life.
Thread size is almost always 3/4 inch NPT on residential water heaters. Some commercial models use 1-1/16 inch threads. The hex head size determines what socket you need. Most residential rods use 1-1/16 inch hex heads. Some use 3/4 inch hex heads.
Check your water heater’s owner’s manual for official specifications. If you don’t have documentation, measure your existing rod after removal. Note the length, diameter, thread size, and hex head size.
Complete Step-by-Step Replacement Process
Follow this process for successful anode rod replacement.
Phase 1: Safety and Shutdown
Turn off power to your water heater first. For electric water heaters, locate your electrical panel and switch off the dedicated water heater breaker. For gas water heaters, turn the gas control valve to “pilot” or “vacation” mode.
Wait 30 minutes after shutting down. This cooling period reduces burn risk from hot water and components. Turn off the cold water supply valve at the tank top. Open a hot water faucet somewhere in your house to relieve pressure. Leave this faucet open throughout the entire process.
Phase 2: Access and Preparation
Locate the anode rod hex head at the tank top. Most rods sit in the center top. Some thread into the hot water outlet on the tank side. A plastic cap might cover the hex head. Remove any cap by twisting counterclockwise.
Clear the workspace above your tank. You need at least 50 inches of vertical clearance for a 44-inch rod. Apply penetrating oil to the hex head if you haven’t already. Spray generously around the hex head where it meets the tank.
Position your bucket and towels around the tank top. Have your new anode rod unwrapped and ready. Apply pipe thread sealant to the new rod’s threads now so it’s ready for immediate installation.
Phase 3: Removing the Old Rod
Position your socket on the hex head. Ensure the socket fully engages all six corners. If using an impact wrench, use short 1 to 2 second bursts at medium power. If using a breaker bar, apply steady increasing pressure counterclockwise.
The threads should break free with a sudden movement. Once free, continue turning counterclockwise by hand. Unthread the rod slowly once it moves freely. For no-drain method, work quickly once the rod starts coming out of the opening.
Pull the rod straight up and out. Maneuver it through any overhead obstacles carefully. Set the old rod aside for disposal.
Phase 4: Inspection
Examine the old rod’s condition. Note how much material remains. Significant diameter reduction or exposed core wire indicates you waited too long. Check the tank opening for debris. Wipe away any sediment or corrosion around the threads.
Look for cracks in the tank top around the opening. Hair-thin cracks indicate potential tank failure. Document any concerning damage with photos.
Phase 5: Installing the New Rod
Thread the new rod by hand to start. Turn clockwise and ensure the threads engage properly. Cross-threading damages both the rod and tank. The rod should turn smoothly by hand for the first several rotations.
Continue hand-tightening until resistance increases. Apply final torque with your socket wrench. Tighten to 30 to 40 foot-pounds. If you don’t have a torque wrench, the rule is hand-tight plus one-quarter to one-half turn more.
Wipe the connection clean. Remove any excess pipe thread sealant squeezed out during tightening. Check for immediate water seepage around the hex head.
Phase 6: System Restart
Close the drain valve if you performed a full flush. Turn on the cold water supply valve slowly at first, then fully open. You’ll hear water rushing into the tank.
Wait for the open faucet to produce steady water flow. Initially, air and water will sputter from the faucet. When the flow becomes steady without air bubbles, close the faucet.
Check the anode rod connection for leaks. Look carefully around the hex head. Minor weeping for the first few minutes is normal as thread sealant compresses.
Restore power to your water heater. For electric models, turn the breaker back on. For gas models, turn the gas valve back to its previous setting. Wait 30 to 60 minutes before testing hot water.
How Much Does a Plumber Charge to Replace an Anode Rod?
Professional anode rod replacement costs $200 to $400 for most residential installations. This investment includes labor, parts, and the plumber’s expertise.
Labor charges represent the bulk of professional costs. Plumbers charge $75 to $150 per hour in most markets. The job takes 1 to 2 hours including travel time, diagnosis, and cleanup. Service call fees of $75 to $100 cover the plumber’s trip to your home.
Parts markup adds 20% to 50% above retail cost. Plumbers purchase anode rods at wholesale prices around $15 to $40. They charge you retail or slightly above, typically $25 to $60.
Additional services increase the total cost. Tank flushing adds $50 to $100. Drain valve replacement adds $30 to $75. Emergency or after-hours service adds $100 to $200.
DIY Cost Comparison
DIY anode rod replacement costs $20 to $60 for the rod itself. Thread sealant adds $3 to $8. Total material cost stays under $70 in most cases.
Tool investment ranges from $30 to $200 depending on what you already own. A socket and breaker bar cost $30 to $50 if purchased new. An impact wrench costs $100 to $200 but serves many future uses.
Time investment runs 1 to 3 hours including preparation and cleanup. Total DIY savings range from $150 to $350 compared to professional service.
When Professional Service Makes Sense
Limited physical mobility makes professional service worthwhile. The job requires bending, reaching overhead, and applying significant force. Severely stuck rods exceed many DIYers’ capabilities. If your first attempts fail, calling a professional prevents damaging your tank.
Warranty concerns favor professional service. Some water heater warranties require licensed plumbers to perform maintenance. Check your warranty terms before DIY to avoid voiding coverage.
Troubleshooting Common Problems
Problems during anode rod replacement are common. Knowing solutions prevents project abandonment.
Anode Rod Completely Stuck
Apply additional penetrating oil and wait 48 hours. Reapply every 12 hours during the waiting period. Use heat if working on a gas water heater. Heat the hex head with a propane torch for 30 to 45 seconds. Never use heat on electric water heaters.
Increase force gradually with a cheater pipe. Slip a 2-foot steel pipe over your breaker bar for extra leverage. Try an impact wrench at maximum power if you started at medium settings.
Call a professional if all methods fail after multiple attempts. Continuing to apply excessive force risks cracking the tank top or stripping threads.
Water Leak After Installation
Tighten the connection an additional one-quarter turn. Minor leaks often result from insufficient tightening. Check for cross-threading if tightening doesn’t stop leaks. Remove the rod and inspect the threads on both the rod and tank.
Verify you used adequate thread sealant. Remove the rod, clean the threads, and reapply sealant. Use 4 to 5 wraps of Teflon tape instead of 3.
Inspect for cracks around the tank opening. Hair-thin cracks can leak even with proper installation. This indicates tank failure requiring replacement.
Insufficient Clearance Above Tank
Measure your actual clearance precisely. A 44-inch rod needs about 48 to 50 inches of total clearance for removal at an angle. Switch to a flexible anode rod if clearance is limited. Segmented designs require only 18 to 24 inches of clearance.
Consider a combination anode rod if your model supports it. These rods thread into the hot water outlet instead of the top center and often have better clearance.
Anode Rod Breaks During Removal
Stop immediately if the rod snaps. The threaded portion remains stuck in the tank. Try an easy-out extractor if enough material protrudes. These spiral tools grip the broken surface and turn counterclockwise for removal.
Professional extraction becomes necessary for severely stuck broken rods. Specialized tools and experience make this a job for experts.
Final Thoughts
Replacing your water heater anode rod ranks among the highest-value maintenance tasks any homeowner can perform. The process requires basic mechanical skills, not plumbing expertise. An impact wrench transforms a potentially frustrating job into a straightforward 30-minute task.
The no-drain method works perfectly for newer tanks while full drainage benefits older systems with sediment buildup. Your $30 to $60 investment in a replacement rod protects an $800 to $2,000 water heater. DIY replacement saves $150 to $350 compared to professional service while giving you complete control over maintenance timing and material selection.
FAQs
Can you replace an anode rod without draining a hot water heater?
Yes, you can replace an anode rod without draining the tank. Turn off the cold water supply and open a hot water faucet to relieve pressure. Work quickly when swapping rods. Expect 1 to 3 gallons to escape during the process.
Can I use an impact wrench to remove an anode rod?
Yes, impact wrenches are highly recommended for anode rod removal. The hammering action breaks corrosion bonds better than steady pressure. Use cordless models with 300+ foot-pounds of breakaway torque and always use impact-rated black oxide sockets.
How do I choose the right size anode rod?
Measure your existing rod from threads to tip or check your water heater’s owner’s manual. Most 40 and 50-gallon tanks use 42 or 44-inch rods with 3/4 inch NPT threads and 1-1/16 inch hex heads.
Can you cut an anode rod to fit?
Never cut a standard rigid anode rod. Cutting exposes the steel core wire without protective reactive metal, defeating the rod’s purpose and accelerating corrosion. Use flexible segmented anode rods designed for low-clearance situations instead.
How much does a plumber charge to replace an anode rod?
Professional anode rod replacement costs $200 to $400 including labor and parts. Labor runs $150 to $300 for 1 to 2 hours. DIY replacement costs $20 to $60 for the rod, saving $150 to $350 total.

