Disclosure: This post contains affiliate links and I will be compensated if you make a purchase after clicking through my links. Learn More
Removing PEX crimp rings can be tricky but is essential for plumbing fixes. Proper removal ensures your piping system works well without leaks.
To remove these rings, you need the right tools and a bit of patience. Understanding how to remove PEX crimp rings can save you time and money. PEX pipes are popular in plumbing because they are flexible and durable. However, if a connection leaks, you might need to replace a section.
Removing the crimp rings is the first step. This process requires precision to avoid damaging the pipe. By learning the correct technique, you can fix issues and maintain your system. In this guide, we’ll walk you through the steps, ensuring you handle your plumbing tasks with confidence.
Tools Needed
Removing Pex crimp rings requires the right set of tools. Having the right tools ensures a smooth and efficient process. This section outlines both essential and optional tools. These tools will help you tackle the task easily.
Essential Tools
Start with a Pex crimp ring removal tool. This tool is specifically designed for this task. A pipe cutter is necessary to cut the Pex pipe. Make sure it is sharp and easy to handle. A go/no-go gauge checks the accuracy of your crimps. This ensures a proper fit and connection. Safety gloves protect your hands from injury. Always wear them while working.
Optional Tools
A heat gun can soften the Pex pipe. This makes removal easier. A utility knife may help in cutting stubborn rings. Make sure it is sharp and handled carefully. A towel or cloth is useful for cleaning the work area. It also helps in drying the Pex pipe before reassembly.

Credit: www.youtube.com
Safety Precautions
Removing PEX crimp rings can be a bit tricky. Safety precautions are essential to ensure the task is done without injury. Proper preparation and gear play a critical role.
Protective Gear
Always wear safety glasses to protect your eyes from flying debris. Gloves are necessary to shield your hands from sharp edges. Long sleeves help prevent cuts and scratches. Ear protection is useful if using power tools.
Work Area Preparation
Clear the area of any unnecessary items. Ensure good lighting to see clearly. Keep a first aid kit nearby for quick access. Make sure your tools are in good condition and within reach. Check for any obstacles that might cause trips or falls.
Preparing The Pex Tubing
Removing PEX crimp rings involves a few simple steps. First, use a crimp ring cutter to carefully slice through the ring. Then, gently twist and pull the ring off the tubing. Ensure the tubing remains undamaged for future use.
Preparing your Pex tubing for crimp ring removal is crucial. Proper preparation ensures a smooth and successful process. This step helps in avoiding damage to your plumbing system. Let’s dive into the necessary steps to prepare your Pex tubing.
###
Inspect The Pex Tubing
Begin by examining the Pex tubing closely. Look for any visible damage. Cracks, kinks, or discoloration may indicate issues. Damaged tubing needs replacement before proceeding. Ensure the tubing is clean and dry. Moisture can make the process difficult.
###
Clear The Surrounding Area
Ensure the area around the tubing is clear. Remove any tools or objects nearby. This will give you ample space to work. A clutter-free space reduces accidents. It also allows for better maneuverability. Proper lighting is essential for visibility. Use a flashlight if necessary.
By preparing the Pex tubing carefully, you set the stage for a successful removal process.
Removing The Crimp Ring
Removing Pex crimp rings can seem tricky at first. These rings secure Pex piping connections, ensuring no leaks occur. But sometimes, you need to remove them for repairs or adjustments. This process requires care to avoid damaging pipes. There are two main methods to remove the crimp ring safely. Let’s explore these techniques.
Cutting The Ring
Cutting the crimp ring is a straightforward method. Use a small hacksaw or rotary tool for precision. Carefully cut through the ring, but avoid touching the pipe. Slowly work around the ring until it’s loose. Use pliers to remove any remaining metal pieces. Ensure the pipe remains undamaged for future use.
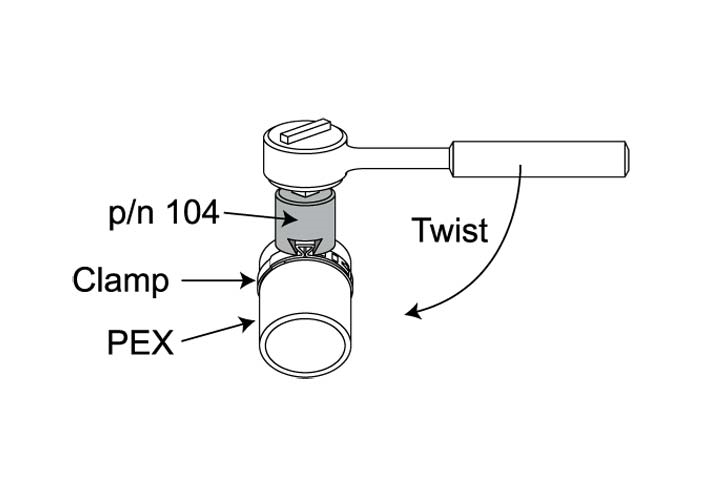
Using A Crimp Ring Removal Tool
A crimp ring removal tool offers an efficient solution. This tool fits over the ring and applies pressure. It breaks the ring without harming the pipe. Simply position the tool around the ring. Squeeze the handles until the ring pops off. This method is quick and reduces the risk of pipe damage.
Checking For Damage
Proper inspection is crucial before removing Pex crimp rings. Damaged components can lead to leaks. Assess the tubing and fittings for any signs of wear. This step ensures a smooth removal process. Prevents future plumbing issues.
Inspect The Tubing
Examine the Pex tubing carefully. Look for cracks or scratches on the surface. Discoloration can indicate damage as well. Feel the tubing for any unusual softness. This may mean it’s compromised. Check for any bends or kinks. These can weaken the tubing structure.
Assess The Fitting
Analyze the fitting attached to the tubing. Ensure it is not loose or wobbly. A secure fitting is crucial for a tight seal. Look for rust or corrosion around the fitting. This can affect its performance. Ensure the fitting is clean and free of debris. Dirt can hinder a proper connection.
Credit: www.diwhheating.com
Installing A New Crimp Ring
Once you have removed the old Pex crimp ring, it’s time to install a new one. This part of the process ensures a secure connection. Let’s break down the steps to make it simple.
Positioning The New Ring
Start by sliding the new crimp ring over the Pex pipe. Make sure it is positioned about 1/8 inch from the end of the pipe. This placement is crucial for a secure fit. The ring should sit between the pipe end and the fitting.
Securing The Ring With A Crimp Tool
Next, take your crimp tool and place it around the crimp ring. Ensure the tool covers the entire ring. Squeeze the handles of the crimp tool firmly until the ring is tightly compressed. Check the connection with a go/no-go gauge. This tool ensures the ring is properly secured.
If the ring passes the gauge test, you have successfully installed the new crimp ring. Your Pex connection is now secure and ready for use.
Testing The Connection
Once you’ve removed the PEX crimp rings and made the necessary repairs or adjustments, it’s crucial to ensure that the connection is secure. Testing the connection helps confirm that the fittings are properly installed and that there are no leaks. Here’s how you can effectively test your PEX connections.
Water Pressure Test
Start by turning on the water supply to the section of the plumbing you’ve worked on. Gradually increase the water pressure to avoid any sudden bursts. Observe the connection closely.
If you have a pressure gauge, attach it to the system. This will give you a clear indication of any drops in pressure, which might suggest a loose fitting or a potential leak. Keeping the pressure stable for a few minutes can help you ensure the connection is solid.
Leak Inspection
Even if the pressure test goes well, a visual inspection is necessary. Use a dry cloth to wipe around the fitting and check for any moisture. Sometimes, minor leaks aren’t immediately apparent but can become problematic over time.
Consider using a piece of tissue paper to detect any small leaks. Place it around the connection and see if it becomes damp. This can be particularly useful if you don’t have a pressure gauge.
Have you ever found a small leak after thinking everything was perfect? Share your experience in the comments and let us know how you fixed it!
Troubleshooting Common Issues
Working with Pex crimp rings can sometimes feel like solving a puzzle. You’re confident you’ve followed all the right steps, yet a few common issues seem to pop up repeatedly. Tackling these challenges head-on can save you time and prevent unnecessary frustration. Let’s dive into some of the typical problems you might encounter while removing Pex crimp rings and how to overcome them.
Leaks At The Joint
Leaks are a common issue that can arise if the crimp ring isn’t properly secured. Imagine the surprise when a newly installed pipe starts leaking. It’s not uncommon and often due to uneven pressure on the ring during installation. Double-check the ring placement; ensuring it’s evenly crimped can prevent leaks. If leaks persist, consider using a gauge to verify the crimp is tight enough.
What if the leak continues despite your efforts? It may be worth examining the pipe itself. Sometimes, tiny abrasions or imperfections can cause these leaks. You might not notice them at first glance, but a detailed inspection might reveal the culprit. Could a small scratch really lead to a big leak?
Difficulty In Removing The Ring
Removing a Pex crimp ring can sometimes feel like trying to open a stubborn jar. You’ve got the tools, but the ring refuses to budge. This difficulty often stems from using the wrong tool or technique. A specialized crimp ring removal tool can make the job significantly easier. It’s like having the right key for a lock.
What happens if the ring still won’t move? Applying a bit of heat can expand the metal slightly, loosening its grip. However, exercise caution to avoid damaging the pipe. It’s a delicate balance between force and finesse. Have you ever had to wrestle with a stubborn ring?
These common issues are like hurdles in a race; they may slow you down but won’t stop you from reaching the finish line. Address them with patience and precision, and you’ll master the art of removing Pex crimp rings. Can overcoming these challenges give you a newfound confidence in your plumbing skills?

Credit: www.youtube.com
Frequently Asked Questions
What Is The Best Way To Remove A Pex Crimp Ring?
Use a PEX crimp ring removal tool to cut through the ring. Then, twist and pull it off carefully. Ensure you don’t damage the pipe during removal. This method is effective and maintains the integrity of the PEX pipe, ensuring a secure fit for future connections.
How To Get A Pex Pinch Clamp Off?
Use a PEX clamp removal tool or cutting pliers. Cut the clamp carefully without damaging the pipe.
How To Remove Pex Push Fittings?
To remove PEX push fittings, use a specialized disconnect tool. Align the tool with the fitting and push firmly. Twist slightly to release the fitting. Ensure the pipe is clean and smooth before reusing. Always follow the manufacturer’s instructions for best results.
How Do You Remove An Expansion Pex Ring?
To remove an expansion PEX ring, cut the ring carefully with a utility knife. Avoid damaging the pipe. Rotate and pull the ring off.
Final Words
Removing Pex crimp rings doesn’t have to be difficult. With the right tools, the process becomes simple. Always ensure safety first. Wear gloves and goggles. Follow the steps carefully. This ensures a clean and efficient removal. Practice makes perfect, so don’t get discouraged.
Once mastered, you’ll save time and money. Remember, patience is key. Check your connections after removal. This prevents future leaks and issues. Now, you’re ready to tackle your next plumbing task. Enjoy the satisfaction of doing it yourself. Happy plumbing!