Disclosure: This post contains affiliate links and I will be compensated if you make a purchase after clicking through my links. Learn More
Removing a PEX clamp may seem tricky at first. But with the right tools and steps, it’s quite simple.
PEX plumbing systems are popular for their flexibility and durability. Sometimes, you need to remove clamps during repairs or upgrades. Understanding how to safely remove a PEX clamp can save time and prevent damage. This guide will walk you through the process step-by-step.
You’ll learn about the tools you need and the techniques to use. Whether you’re a DIY enthusiast or a homeowner handling plumbing issues, this knowledge is essential. Tackle your plumbing projects with confidence. Let’s dive into the details of removing PEX clamps effectively!
Tools Required
Essential tools include a PEX clamp removal tool, pliers, and a utility knife. These tools ensure the PEX clamp is removed safely and efficiently. Proper preparation minimizes damage to the pipe and fittings.
If you’ve ever tackled a plumbing project involving PEX pipes, you know that removing PEX clamps can be a bit tricky without the right tools. The right tools make the job not only easier but also safer. Have you ever found yourself wrestling with a stubborn clamp, only to realize you were missing a tool? You’ll want to ensure you’ve got everything you need before starting the task. Let’s dive into the essential and optional tools required for a smooth clamp removal process.
Essential Tools List
To successfully remove PEX clamps, there are a few must-have tools you’ll need:
– PEX Clamp Removal Tool: This tool is specifically designed to cut through the clamp without damaging the pipe. It’s a game-changer for a clean removal.
– Pliers: Standard pliers can help grip and hold the clamp as you work. They are also useful for other adjustments.
– Utility Knife: Sometimes, cutting through the PEX pipe is necessary if the clamp is too tight or damaged. A sharp utility knife can be your best friend here.
– Safety Glasses: Protecting your eyes is crucial when cutting metal clamps. Flying debris can be dangerous.
Are you equipped with these tools already, or do you need to make a quick run to the hardware store?
Optional Tools For Ease
While the essential tools will get the job done, a few additional tools can make the process smoother:
– Heat Gun: If the clamp is stubborn, gently heating it can make removal easier. Just be careful to avoid overheating the PEX pipe.
– Work Gloves: Protect your hands from cuts and abrasions. Trust me, you’ll thank yourself later.
– Flashlight: Good lighting is essential, especially if you’re working in a dimly lit area. A flashlight helps ensure you see what you’re doing clearly.
Have you ever tried using a heat gun for clamp removal? It might just save you some frustration.
Ensuring you have these tools at your disposal can make the difference between a smooth project and a frustrating one. Remember, preparation is key. What’s your go-to tool for PEX clamp removal?

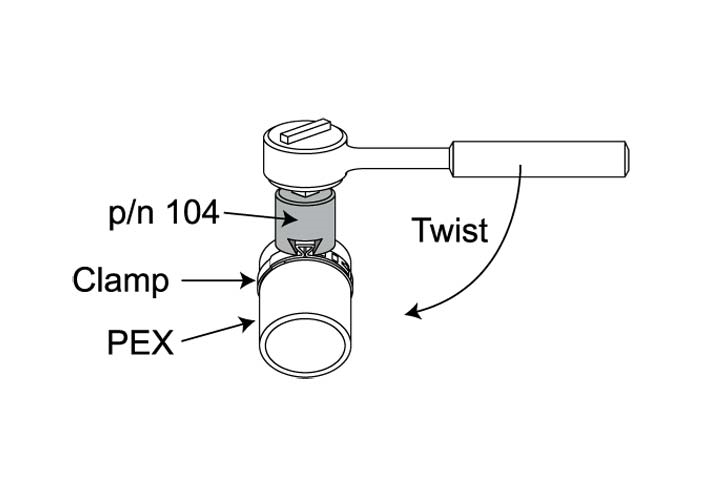
Credit: www.instructables.com
Safety Measures
Ensure safety by wearing gloves and eye protection. Use a clamp removal tool to cut the Pex clamp. Carefully avoid damaging the pipe.
Removing Pex clamps can be a straightforward process if done correctly. However, it’s essential to follow safety measures to prevent accidents and ensure a smooth experience. Let’s delve into the necessary safety precautions you should take.
###
Protective Gear
Wearing the right protective gear is non-negotiable. Always wear safety glasses to protect your eyes from flying debris when cutting the clamps.
Gloves are also vital. They provide a better grip and protect your hands from sharp edges.
Ear protection is a good idea if you’re using noisy tools. Ensure you have these basic items before starting.
###
Safe Work Environment
A clutter-free workspace is crucial for safety. Ensure your work area is well-lit so you can see what you’re doing clearly.
Keep your tools organized and within reach to avoid unnecessary movements that could lead to accidents.
Ensure there are no flammable materials around if you’re using tools that generate heat. A tidy and well-organized workspace reduces the risk of mishaps.
Removing Pex clamps may seem simple, but safety should always be your priority. What other safety tips do you find crucial for DIY projects? Share your thoughts in the comments!
Identifying Pex Clamps
Removing Pex clamps requires a basic understanding of tools. Use a Pex clamp removal tool for efficiency. Simply position the tool over the clamp’s tab and squeeze to release it. Ensure the pipe remains undamaged during this process. Proper technique ensures a smooth removal, making plumbing tasks easier.
Understanding how to identify Pex clamps is essential for anyone looking to tackle a plumbing project. Whether you’re a seasoned DIY enthusiast or just getting started, knowing the different types of Pex clamps and their common uses can make your task significantly easier. This can save you both time and frustration, ensuring your plumbing stays leak-free.
Types Of Pex Clamps
There are primarily two types of Pex clamps: crimp rings and cinch clamps. Crimp rings are made from copper and require a special crimping tool to secure them. They are known for their durability and reliability.
On the other hand, cinch clamps are typically stainless steel and use a ratchet tool for installation. They offer flexibility, as they can be used in tight spaces where a crimping tool might not fit. Each type has its pros and cons, depending on your specific needs.
Common Uses
Pex clamps are widely used in residential plumbing for water supply lines. They are popular due to their ease of installation and cost-effectiveness.
You might find them in your bathroom fixtures or kitchen plumbing, where they secure Pex tubing to fittings. They are also used in radiant heating systems, providing a secure connection for hot water circulation.
Have you ever faced a leaky fitting after installation? The right clamp type can prevent such issues, ensuring a secure and long-lasting connection. Knowing where and how to use each type of clamp can greatly affect the efficiency and reliability of your plumbing projects.
Credit: www.diwhheating.com
Preparation Steps
Removing Pex clamps requires careful preparation to ensure a smooth process. Taking the right steps can prevent damage and make the task easier. Start with a clear understanding of what each preparation step involves.
Inspecting The Clamp
Begin by closely examining the Pex clamp. Look for any visible signs of wear or damage. Check if the clamp is rusted or has any deformities. This inspection helps determine if special tools are needed. Knowing the condition of the clamp guides your removal strategy.
Ensuring System Is Off
Turn off the water supply before starting work. This step is crucial for safety. Make sure all related systems are inactive. Confirm the water is completely shut off by testing a nearby faucet. This ensures no accidental leaks or spills occur during clamp removal.
Clamp Removal Process
Removing a Pex clamp can feel challenging, but the process is simple. With the right tools and technique, you can easily detach a Pex clamp. This guide will walk you through the steps of loosening and removing the clamp. Follow the instructions carefully to prevent damage and ensure successful removal.
Loosening Techniques
Start by gathering the necessary tools. You will need a pair of pliers or a clamp removal tool. Position the tool around the clamp. Ensure it fits snugly. Apply gentle pressure to start loosening the grip. Move the tool back and forth if needed. This helps break the seal without damaging the pipe. Patience is crucial here.
Removing The Clamp
Once loosened, proceed to remove the clamp. Hold the pipe firmly to prevent movement. Carefully slide the clamp off the pipe. If the clamp resists, repeat the loosening steps. Ensure no part of the pipe is damaged. Inspect the pipe for any wear or tear. After removal, check the area for any leaks. Proper removal ensures the pipe remains intact.
Handling Residual Water
To remove a Pex clamp, use a Pex clamp removal tool or a flathead screwdriver. Ensure the water is turned off to avoid spills.
Removing a Pex clamp can leave water behind. Handling this water properly is crucial. Residual water can cause damage. It can lead to mold or mildew. Here’s how to manage it effectively.
Draining Techniques
To begin, turn off the main water supply. This prevents more water from entering the pipes. Next, open the nearest faucet. This helps drain any remaining water from the pipes. Use a bucket to catch the draining water. This keeps the area clean and dry.
Drying The Area
Once the water is drained, drying the area is essential. Use a clean towel to wipe down the pipes. Ensure all surfaces are dry. You can also use a fan to speed up the drying process. Proper drying prevents mold and mildew growth. Make sure to check for any hidden water pockets. These can cause problems later.
“`
Post-removal Inspection
Removing a Pex clamp involves cutting the clamp with a Pex clamp removal tool. Ensure to inspect the area post-removal for any potential damage.
After removing a Pex clamp, it’s essential to inspect the area. This step ensures your plumbing system remains in good condition. A thorough inspection helps identify any issues early.
Checking For Damage
Inspect the pipe for any visible damage. Look for cracks or dents. These can cause leaks later. Check the fitting and surrounding area. Ensure everything appears intact.
If you find any damage, consider replacing the damaged parts. This will prevent future issues. A careful inspection helps maintain a reliable plumbing system.
Cleaning The Area
Once you check for damage, clean the area. Remove any debris or residue. Use a clean cloth for this task. Ensure the pipe and fittings are free from dirt.
Cleaning helps in proper reinstallation. It also ensures a smooth connection. A clean area reduces the risk of leaks. Keep your tools and workspace tidy.
“`
Installing New Clamp
Installing a new clamp is an essential step after removing the old Pex clamp. Getting it right ensures the longevity and reliability of your plumbing system. Let’s dive into how you can choose the right clamp and install it correctly.
Choosing The Right Clamp
Not all clamps are created equal. Picking the right one can be a game-changer for your project. Consider the material—stainless steel clamps offer durability and resistance to corrosion. They might cost a bit more, but they save money in the long run.
Size matters. Measure your Pex tubing accurately before buying clamps. Too tight or too loose can lead to leaks and hassles. Imagine finding the perfect clamp only to realize it doesn’t fit; avoid this by double-checking your measurements.
Installation Tips
Before starting, gather all your tools. A clamp tool is essential for a secure fit. Without it, you risk an improper installation. Trust me; I’ve learned this the hard way when I thought pliers would suffice.
Position the clamp correctly. Make sure it’s evenly placed over the tubing. Uneven placement can lead to leaks, and nobody wants to deal with that mess. Can you picture a puddle forming under your sink after a long day?
Apply consistent pressure when tightening the clamp. It’s tempting to rush, but patience pays off. A steady hand ensures a snug fit. If you’re unsure, take a break; come back with a fresh perspective and steady grip.
Have you ever wondered why some installations last longer than others? Attention to detail during installation is often the answer. Double-check your work for peace of mind and a leak-free future.
By focusing on these practical tips, you ensure a successful clamp installation. A little effort today saves headaches tomorrow. What adjustments can you make to improve your installation skills?
Troubleshooting Common Issues
Removing Pex clamps can sometimes present unforeseen challenges. Understanding these issues can save time and effort. This guide provides solutions to common problems faced during removal.
Difficult Clamps
Some clamps might seem impossible to remove. This can happen due to corrosion or tight installation. Use a Pex clamp removal tool for effective results. Ensure you grip the clamp securely to avoid slippage. If corrosion is the issue, apply a penetrating oil. Allow it to sit for a few minutes.
This can loosen the clamp, making removal easier. If the clamp remains stubborn, consider using a hacksaw. But proceed with caution to avoid damaging the pipe.
Leaks And Fixes
Leaks can occur during or after clamp removal. Inspect the pipe for any visible damage. If the pipe is cracked, it must be replaced. Ensure the new clamp is properly secured to prevent leaks. Double-check the clamp’s tightness using a torque wrench. This ensures the clamp is neither too loose nor too tight. If leaks persist, re-evaluate the fittings. Consider consulting a professional plumber for persistent issues.

Credit: www.youtube.com
Frequently Asked Questions
Can A Pex Clamp Be Removed?
Yes, a PEX clamp can be removed using a clamp removal tool or cutting it carefully with pliers. Ensure to avoid damaging the PEX tubing during removal. After removal, you can replace the clamp with a new one if needed for secure connections.
How To Remove Pex Pinch Clamp Without Tool?
To remove a PEX pinch clamp without a tool, use a flathead screwdriver and pliers. Insert the screwdriver under the clamp, then twist to loosen. Grip the clamp with pliers and pull it off carefully. Always ensure safety to avoid damaging the pipe or injuring yourself.
What Is The Best Way To Remove A Pex Crimp Ring?
Use a PEX crimp ring removal tool for easy and efficient removal. First, cut the pipe close to the fitting. Next, position the tool’s jaws around the crimp ring and squeeze the handles to cut through it. Finally, slide the ring off and remove the fitting.
How To Get Crimped Hose Clamps Off?
Use pliers to grip the clamp’s crimped spot. Twist and pull gently to loosen. Cut the clamp if needed. Ensure safety by wearing gloves and eye protection. Dispose of the removed clamp properly.
Final Words
Removing a Pex clamp is straightforward with the right tools. First, ensure you have the necessary cutter. It makes the process easier. Cut through the clamp with steady pressure. Avoid damaging the pipe. Practice patience and precision. This prevents costly mistakes.
Once removed, inspect the pipe. Check for any signs of wear. Replace with a new clamp if needed. Regular checks help maintain plumbing health. It saves time and money in the long run. Efficient plumbing keeps your home running smoothly.
Trust your skills and stay informed. Happy plumbing!