Disclosure: This post contains affiliate links and I will be compensated if you make a purchase after clicking through my links. Learn More
Picture this: You’re redecorating your bathroom and everything is going smoothly until you realize that installing a toilet paper holder is going to involve drilling holes into your freshly painted walls. You might be worried about the mess, the damage, or simply want to avoid the hassle altogether.
Luckily, there’s a simple solution that can save you time and keep your walls pristine: installing a toilet paper holder without screws. Imagine the satisfaction of having a stylish, functional bathroom accessory without any of the usual headaches. In this guide, you’ll discover step-by-step instructions and tips to effortlessly enhance your bathroom’s look without breaking a sweat.
Ready to keep your walls hole-free and your bathroom chic? Let’s dive in!

Credit: www.youtube.com
Choosing The Right Adhesive
Choosing the right adhesive is crucial when installing a toilet paper holder without screws. You might wonder, “Why not just grab any old glue?” The truth is, the adhesive you choose will determine how well your holder stays put. Imagine reaching for toilet paper only to find the holder has fallen off—frustrating, right? Let’s dive into the options you have, and help you make an informed choice.
Types Of Adhesive Options
There are several adhesive types you can consider for your project:
- Double-sided tape:Simple and easy to use, this tape can hold lightweight objects securely.
- Mounting strips:These strips are designed for heavier items and offer a reliable hold.
- Glue:Specifically, strong adhesive glue meant for bathrooms can be a great option.
- Adhesive pads:These are versatile and can be used on different surfaces.
Pros And Cons Of Each Adhesive
Every adhesive has its benefits and drawbacks. Let’s break them down:
| Adhesive Type | Pros | Cons |
|---|---|---|
| Double-sided tape | Easy to apply, affordable | May not support heavier holders |
| Mounting strips | Strong hold, good for heavy items | Can be more expensive |
| Glue | Excellent for permanent fixes | Messy application, hard to remove |
| Adhesive pads | Flexible, easy to remove | Less durable over time |
Consider your bathroom’s humidity and the weight of your toilet paper holder. If your holder is heavy, adhesive pads might not be the best choice. On the other hand, double-sided tape could be perfect for a lightweight holder. But remember, the environment matters. Will your bathroom’s moisture affect the adhesive’s strength?
Reflecting on my own experience, I once opted for double-sided tape in a humid bathroom. It held up well initially but eventually lost its grip. This taught me the importance of considering both weight and humidity. How do you plan to tackle these challenges?
Take your time to evaluate each option. Your choice will impact not just the installation, but the future convenience of reaching for toilet paper effortlessly. Your bathroom deserves the best; make sure your adhesive lives up to the task.

Credit: www.reddit.com
Preparing The Surface
To install a toilet paper holder without screws, prepare the surface first. A clean and smooth surface ensures the holder sticks well. Follow these steps to get it right.
Cleaning Techniques
Start by cleaning the wall area. Use a damp cloth to wipe away dust. For stubborn dirt, use a mild detergent solution. Rinse the area with clean water. Dry the wall thoroughly with a soft towel. This step removes grime, ensuring a strong adhesive bond.
Ensuring A Smooth Surface
Check the wall for rough spots. Sand down any bumps with fine-grit sandpaper. A smooth surface helps the adhesive grip better. After sanding, wipe the wall again. This removes any dust left from sanding. A smooth, clean wall is ready for the holder installation.
Positioning The Holder
Installing a toilet paper holder without screws can simplify your bathroom update. A key step in the process is positioning the holder correctly. This ensures easy access and maintains bathroom aesthetics. Proper placement enhances functionality and user comfort.
Determining The Best Location
The first step is determining the best location for your holder. Choose a spot that’s easy to reach from the toilet. Consider the height and distance from the seat. A comfortable reach ensures user convenience. Avoid placing it too close to the floor. This prevents accidental contact with water or cleaning supplies.
Marking For Precision
Marking for precision is crucial. Use a pencil to lightly mark the chosen spot. Ensure the marks are level. Use a spirit level for accuracy. This helps maintain a straight alignment. Double-check measurements to avoid misalignment. Proper marking ensures the holder stays securely in place.
Applying The Adhesive
Applying adhesive to install a toilet paper holder without screws can be a simple yet effective solution. Whether you’re renting or simply want to avoid drilling holes, adhesive options offer a clean and damage-free installation. But how do you ensure a strong bond that lasts? Let’s dive into the step-by-step application process and explore tips for achieving secure attachment.
Step-by-step Application Process
Start by selecting the right adhesive. Double-sided tape or adhesive strips are popular choices. Ensure the surface where you’ll attach the holder is clean and dry. A damp cloth can remove any dust or residue that might hinder bonding.
Measure and mark the desired position for your toilet paper holder. This avoids misalignment and ensures the holder is at a comfortable reach. Stick the adhesive to the back of the holder, pressing firmly to ensure it adheres properly.
Next, position the holder against the wall, applying pressure for about 30 seconds. This step is crucial; a firm press allows the adhesive to settle and grip the surface better.
Tips For Strong Bonding
Choose an adhesive designed for bathroom environments. Moisture-resistant adhesives prevent weakening over time. Remember, not all adhesives are equal; some are better suited for tiled surfaces, while others work on painted walls.
Consider the weight of your toilet paper holder. Heavier holders might require a stronger adhesive. If unsure, opt for adhesive strips labeled “heavy-duty.” They offer extra grip and durability.
Think about the bathroom’s climate. If it’s often humid, you might need to dry the surface with a hairdryer before applying the adhesive. This small step ensures the adhesive sticks properly, even in steamy conditions.
Have you ever installed something only to find it falling off a few days later? By following these tips, you can avoid that frustration and enjoy a securely mounted toilet paper holder. What other creative methods have you tried for screw-free installations?
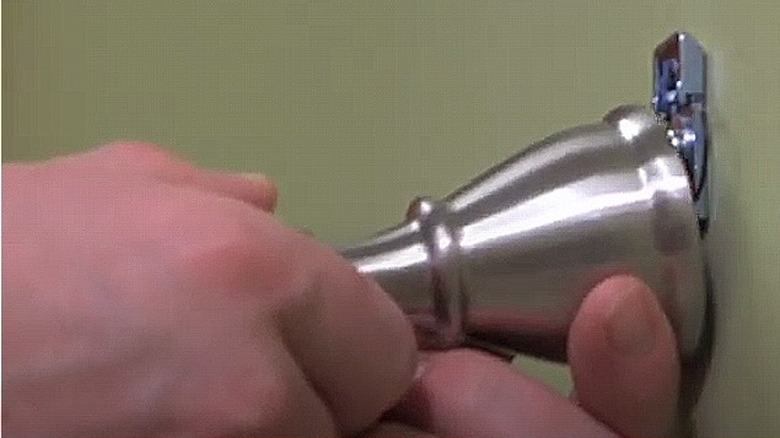
Securing The Holder
Securing a toilet paper holder without screws involves careful alignment and pressure application. This technique offers a clean and damage-free installation method. It avoids drilling into walls, making it ideal for renters and those seeking a quick fix. By following a few simple steps, you can ensure that your holder stays firmly in place.
Aligning And Pressing
First, position the holder at the desired height. Ensure it is level using a spirit level or visual assessment. Once aligned, press the adhesive pads firmly against the wall. This creates a strong bond between the holder and the surface. Hold it in place for a few seconds to enhance adhesion.
Testing Stability
After securing the holder, test its stability. Gently tug on the holder to check for movement. If it shifts, adjust its position and press again. Make sure it’s tightly secured before adding toilet paper. Repeat the pressing step if necessary to achieve a solid attachment.
Credit: www.housedigest.com
Maintenance And Care
Installing a toilet paper holder without screws involves adhesive brackets or suction cups. Clean the surface thoroughly before attaching. Ensure proper placement for easy access and comfort.
Maintaining and caring for a toilet paper holder that doesn’t require screws is crucial to ensure its longevity and reliability. While these holders offer convenience and flexibility, they also demand a bit of attention to keep them working optimally. Let’s dive into how you can keep your screw-free toilet paper holder in top shape with some simple maintenance tips.
Cleaning Without Damage
Keeping your toilet paper holder clean is essential, but doing it without causing damage is key. Use a soft, damp cloth to gently wipe the holder. Avoid harsh chemicals or abrasive scrubbers that can scratch or weaken the adhesive or suction mechanisms.
A mild soap solution is usually enough to tackle any grime or buildup. Rinse and dry the holder thoroughly to prevent any water spots or residue. Consider how often you clean it; a monthly wipe-down can keep it looking new.
Reapplying When Necessary
Adhesive or suction-based holders might lose their grip over time. Reapplication is a simple fix if you notice your holder sliding or falling. Start by cleaning the surface thoroughly to remove any soap scum or dust. Follow the manufacturer’s instructions for reapplying the adhesive or suction cup. Ensure the surface is completely dry before reattaching.
This ensures a strong hold and avoids unnecessary falls or damage. Does the idea of reapplying seem like a hassle, or is it a small price to pay for the convenience of not drilling into your walls? It’s a question of priorities. By taking these steps, your screw-free toilet paper holder can serve you well for a long time, providing both functionality and ease of maintenance.
Final Words
Installing a toilet paper holder without screws is simple. It saves time and hassle. You need the right tools and adhesive. Follow easy steps to ensure strong attachment. No need to worry about damaging walls. This method works well for renters and homeowners.
Enjoy a clean, organized bathroom. Feel confident in your DIY skills. Try it today for a quick bathroom upgrade. Remember, practice makes perfect. Keep your bathroom tidy and stylish with minimal effort. Happy installing!