Disclosure: This post contains affiliate links and I will be compensated if you make a purchase after clicking through my links. Learn More
Fixing a leaking shower can seem daunting. Especially if you think you need to remove tiles.
The good news is, you don’t have to. Leaking showers are common. They can cause damage if left unchecked. But, you can fix the issue without tearing up your bathroom. This guide will show you how. You’ll learn simple steps to stop the leak.
You won’t need special tools or skills. Just follow these instructions. Save time and money by doing it yourself. Read on to discover how you can fix your leaking shower without removing a single tile.

Credit: www.youtube.com
Identifying The Leak Source
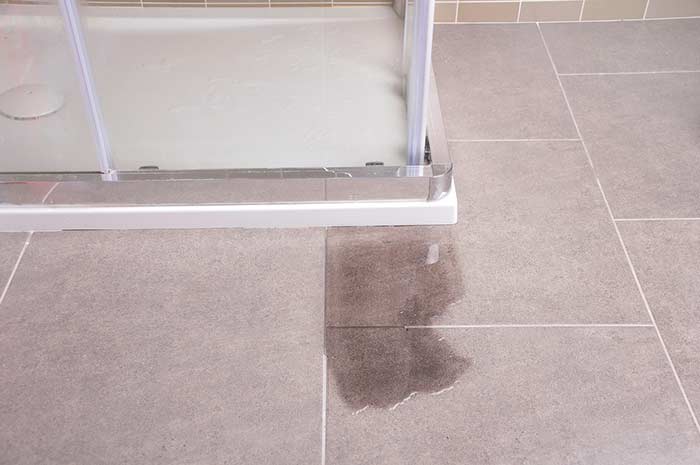
Finding the source of a shower leak is crucial for fixing it without removing tiles. Check for visible water stains or damp spots. Inspect seals around the showerhead, faucet, and drain for any signs of wear.
Fixing a leaking shower without removing tiles can save you time and money. But before you grab your tools, identifying the leak source is crucial. Knowing exactly where the leak originates helps you target the problem effectively. Let’s dive into how you can pinpoint the leak with precision.
Common Leak Areas
Shower leaks often stem from a few key areas. Check the showerhead first; a loose connection can cause water to seep out. The shower arm is another potential culprit, especially if it’s not sealed properly to the wall. Don’t forget the grout lines between tiles, which can degrade over time, allowing water to escape.
Pay attention to the shower door frame as well. If the seals are worn out, water might be escaping during your showers. Lastly, inspect the drain area, as faulty seals can lead to leaks.
Tools Needed For Inspection
To inspect the leak source, you’ll need a few essential tools. A flashlight is helpful for spotting hidden leaks in dark corners or behind fixtures. A screwdriver might be necessary to tighten loose connections or remove covers.
Consider using a moisture meter to detect damp areas in the walls or flooring, which can indicate a hidden leak. A magnifying glass can be surprisingly useful for examining grout lines or small cracks. These tools are your allies in the quest to stop the leak.
Have you ever thought about how a simple flashlight can uncover hidden secrets in your bathroom? Sometimes, the simplest tools can reveal the most critical issues. With the right equipment, you’ll be empowered to find the leak source without having to tear up your tiles.
Credit: www.myshower.com.au
Prepping The Shower Area
Fix a leaking shower without removing tiles by sealing cracks and replacing old grout. Ensure waterproofing around joints to prevent water damage. Regular maintenance keeps the shower area dry and secure.
The first step in fixing a leaking shower without removing tiles is prepping the shower area. Proper preparation ensures that repairs are effective and long-lasting. Let’s walk through the essential steps to get your shower ready for repair.
Cleaning The Surface
Start by thoroughly cleaning the shower area. Use a mild detergent and a sponge to scrub all surfaces. Focus on the corners and edges where grime and soap scum can accumulate.
Rinse with warm water and wipe down with a clean cloth. Removing all dirt and debris is crucial for any repair materials to adhere properly. A clean surface can make all the difference in the longevity of your fix.
Drying The Affected Area
Once the surface is clean, ensure it’s completely dry before proceeding. Use a towel to wipe away excess moisture. For a quicker result, you can use a hairdryer to speed up the drying process.
Pay extra attention to the areas where leaks are most noticeable. Moisture can prevent sealants from setting correctly, leading to further leaks. A dry surface is key for a successful repair.
Have you ever tried fixing something only to find it didn’t last? Proper preparation can save you from repeating the process.
Ensuring the area is clean and dry sets the stage for a solid repair job. So, take your time with these steps. It’s worth the effort for a leak-free shower.
Applying Sealant To Shower Fixtures
Applying sealant to shower fixtures is a practical way to fix leaks without removing tiles. Sealant can prevent water from seeping into unwanted areas. This technique is useful for addressing minor leaks in your shower. A proper application ensures your shower remains watertight.
Choosing The Right Sealant
Different sealants exist for various purposes. For a shower, choose a waterproof silicone sealant. This type resists mold and mildew. It also withstands constant exposure to water. Read labels carefully before purchasing. Opt for sealants labeled for bathroom use.
Steps To Apply Sealant
First, clean the area around the fixtures. Remove old sealant using a scraping tool. Ensure the surface is dry before applying new sealant. Cut the nozzle of the sealant tube at a 45-degree angle. This helps control the flow of sealant.
Next, apply the sealant evenly around the fixtures. Use steady pressure to ensure a consistent line. A caulking gun will help with this step. After application, smooth the sealant with a damp finger or tool. This ensures it adheres properly.
Allow the sealant to cure for at least 24 hours. Avoid using the shower during this time. This ensures the sealant sets correctly. Once cured, test the area for any leaks. Reapply sealant if necessary to ensure a secure fit.
Fixing Grout Lines
Fixing grout lines can help repair a leaking shower without removing tiles. Apply new grout over the old one to seal gaps and prevent water leaks.
Fixing grout lines is a practical way to stop a leaking shower without tearing up your tiles. This method involves removing the old grout and applying new grout in its place. It’s a straightforward process that can save you time and money. Plus, it keeps your bathroom looking clean and fresh.
###
Removing Old Grout
Begin by gathering your tools. You’ll need a grout saw or a grout removal tool. These are available at most hardware stores and are easy to use.
Carefully scrape out the old grout from between the tiles. Take your time to avoid damaging the tiles. A steady hand ensures you remove only the grout.
Once removed, clean the area with a damp cloth. This removes any debris and prepares the surface for new grout.
###
Applying New Grout
Choose the right grout for your shower. Consider factors like color and water resistance. This small decision can make a big difference.
Mix the grout according to the package instructions. Ensure it has a smooth consistency. It should be thick enough to stay put but not too hard to spread.
Apply the grout using a rubber float. Press it into the gaps, moving diagonally across the tiles. This technique helps fill the lines evenly.
Wipe off excess grout with a damp sponge. Keep the pressure gentle to avoid removing too much. Rinse the sponge often to keep it clean.
Once dry, polish the tiles with a soft cloth. This removes any haze left by the grout. Your shower should now be leak-free and looking good as new.
Have you ever fixed grout lines yourself? How did it go? This DIY task can be a rewarding experience, leaving your bathroom both functional and beautiful.
Using Waterproof Tape
Waterproof tape effectively seals shower leaks without removing tiles. It’s easy to apply and provides a durable barrier. This quick fix saves time and effort, ensuring a dry, worry-free shower experience.
If your shower leaks, fixing it without removing tiles is possible. Waterproof tape is a practical solution. It offers a quick fix. It seals leaks efficiently and prevents water damage. Easy to apply, waterproof tape is a great choice for DIY enthusiasts. Let’s explore its types and application method.
Types Of Waterproof Tape
Various types of waterproof tape are available. Each serves different purposes. Silicone tape is popular for its flexibility. It wraps around surfaces easily. Another type is butyl rubber tape. Known for its strong adhesion, it lasts long. Vinyl tape is also used. It is durable and resistant to moisture.
Proper Tape Application
Clean the leaking area first. Remove dirt and moisture. This ensures the tape sticks well. Cut the tape to the needed length. Start applying it from one end. Press firmly as you go. Overlap the tape slightly. This creates a tight seal. Check for gaps. Ensure the tape covers the entire leak.
Recaulking The Shower
Recaulking your shower is a straightforward solution to fix leaks without tearing apart your tiles. It’s a task that you can accomplish over a weekend with minimal tools. The process is simple, and it can drastically improve your bathroom’s appearance while keeping water where it belongs. Have you ever tackled a DIY project and felt accomplished afterward? This could be one of those moments!
Removing Old Caulk
Start by inspecting the existing caulk around your shower edges. Check for areas that look cracked or moldy. These are the culprits of your leak issues.
Use a caulk removal tool or a utility knife to carefully scrape away the old caulk. Be gentle to avoid damaging the tiles or shower walls. Patience is key here; rushing might lead to scratches.
Once removed, clean the area thoroughly with a mixture of water and vinegar. This will eliminate any remaining residue and prepare the surface for new caulk.
Applying New Caulk
Choose a high-quality silicone caulk that is specifically designed for bathrooms. This type of caulk is water-resistant and mold-proof, ensuring long-lasting results.
Cut the tip of the caulk tube at a 45-degree angle for better control. Apply the caulk evenly along the edges of the shower, covering all gaps. Steady your hand to maintain a consistent bead.
After application, smooth the caulk with a caulking tool or your finger dipped in soapy water. This ensures a neat finish and proper adhesion. Let the caulk cure for 24 hours before using the shower. Are you ready to see the difference a simple recaulking can make?
Testing For Leaks
Fixing a leaking shower without removing tiles involves checking seals around fixtures. Apply waterproof sealant to cracks and gaps. Ensure the showerhead connection is tight.
Testing for leaks is a crucial step in fixing a leaking shower without removing tiles. You might think that leaks are easy to spot, but they can be surprisingly sneaky, hiding in places you least expect.
Before jumping to conclusions, it’s essential to verify the source of the leak. A thorough inspection can save you both time and money.
Below are practical steps on how to effectively test for leaks.
Running A Water Test
Start by running a water test to pinpoint the leak.
Turn on the shower and let it run for a few minutes.
Carefully observe if water pools around the shower or on the bathroom floor. This will help determine if the leak is external or internal.
Place a towel or cloth around suspected areas to see if they get wet.
If the towel gets damp, you’ve likely found your leak source.
It’s a simple, yet effective method that doesn’t require special tools.
Checking For Remaining Leaks
Once you identify the primary leak, check for any remaining leaks.
Leaks can be like a game of hide and seek, and they might not all show up immediately.
Turn off the shower and check around the fixtures and seals.
Feel for moisture with your hand to catch sneaky leaks that might escape your eyes.
Consider using a flashlight to inspect the hard-to-see areas.
It’s amazing how a little extra light can reveal hidden problems.
By being thorough, you ensure you won’t miss any lingering leaks.
Testing for leaks might sound tedious, but it’s a vital step that can make fixing your shower a breeze.
Wouldn’t it be frustrating to fix one leak only to discover another lurking around?
Taking the time to test thoroughly ensures you tackle the problem effectively, saving you from future headaches.
Preventive Maintenance Tips
Maintaining your shower to prevent leaks without removing tiles can save you time and money. Simple regular checks and daily habits can make a big difference. Preventive maintenance is not just about avoiding costly repairs, but also ensuring your shower lasts longer and works well.
Regular Inspection Routine
Do you often forget to inspect your shower? It’s easy to overlook it, but regular checks can catch problems early. Inspect the grout lines for cracks and any missing pieces. These small gaps can be entry points for water.
Take a close look at the caulking around the edges of your shower. If it’s peeling or cracked, it may need replacing. A fresh seal can prevent leaks and keep your shower watertight.
Consider using a flashlight to check hidden areas. Shadows can hide issues that need attention. Is there any discoloration on the walls or floor? This could be a sign of a leak.
Keeping The Shower Dry
Drying your shower after use can be surprisingly effective. Use a towel or squeegee to remove excess water. This simple habit can prevent moisture buildup that leads to leaks.
Ventilation is your ally. Keep the bathroom fan running or open a window after showering. This helps to dry out any lingering moisture, reducing the risk of mold and leaks.
Place a small mat outside the shower to catch any water. This keeps the floor dry and prevents water from seeping into the tiles. Are you ready to make these small changes for big results?
By integrating these preventive maintenance tips into your routine, you can enjoy a leak-free shower without the hassle of removing tiles. What simple habits will you start today?
Credit: unitedtradelinks.com.au
Frequently Asked Questions
Can You Fix Waterproofing Without Removing Tiles?
Yes, you can fix waterproofing without removing tiles. Use liquid membrane or epoxy solutions for minor repairs. These methods effectively seal leaks and prevent water damage. Consult a professional for a thorough assessment and solution tailored to your needs.
Can A Leaking Tile Shower Be Repaired?
Yes, a leaking tile shower can be repaired. Identify the source, replace damaged tiles, and reseal the grout. Ensure proper waterproofing to prevent future leaks.
What Is The Best Way To Seal A Leaking Shower?
To seal a leaking shower, clean the area thoroughly. Apply waterproof silicone sealant to the joints and edges. Allow it to dry for at least 24 hours before using the shower. Regularly check for new leaks and maintain the sealant to ensure long-lasting results.
How To Dry Out Water Under Tiles Without Removing Them?
Use a wet vacuum to remove excess water. Apply fans and dehumidifiers to dry the area thoroughly. Ensure proper ventilation.
Final Words
Fixing a leaking shower without removing tiles saves time and effort. Remember, proper sealing prevents future leaks. Regular inspection helps catch issues early. Using waterproof sealant is effective and simple. A little care goes a long way. Protecting your shower ensures a lasting solution.
Confidence grows with each repair step. Enjoy a leak-free shower with less hassle. Your bathroom stays safe and dry. Keep these tips handy for easy repairs. Maintain your shower’s integrity with simple techniques. Happy showering!

