Disclosure: This post contains affiliate links and I will be compensated if you make a purchase after clicking through my links. Learn More
Adjusting a toilet float is easier than you think. A properly adjusted float helps your toilet function well.
Is your toilet running too long or not filling properly? The culprit may be the toilet float. This simple yet crucial component regulates the water level in your toilet tank. Understanding how to adjust it can solve many common toilet problems.
It might sound technical, but with a little guidance, you can do it yourself. In this guide, we will walk you through the steps needed to adjust your toilet float. By the end, you will have a smoothly working toilet. Let’s dive into the details to ensure your toilet operates efficiently.
:max_bytes(150000):strip_icc()/adjusting-types-of-toilet-ballcocks-1824861-09-91d82c57bfd042aaa67346e60634f872.jpg)
Credit: www.thespruce.com
Tools And Materials
Gather essential tools like a screwdriver and pliers. Use common materials such as a replacement float and adjustable wrench. These items simplify the task of adjusting a toilet float effectively.
Adjusting the toilet float may seem like a daunting task, but with the right tools and materials, you can do it easily. Understanding what you need before starting will save you time and frustration. Let’s dive into the essentials and optional materials that will make this task straightforward and hassle-free.
Essential Tools
Having a few basic tools on hand can make all the difference. A screwdriver is often necessary to adjust the float arm. Depending on your toilet, you might need either a flathead or a Phillips head.
A pair of pliers can also be handy, especially if components are stiff or hard to adjust by hand.
Finally, a towel or sponge is useful to soak up any water that might spill during the process.
Are there any tools you frequently find yourself reaching for when tackling simple home repairs?
Optional Materials
While not always necessary, some materials can make the job easier or more efficient. A replacement float might be useful if the current one is damaged or not functioning properly.
If you’re dealing with a particularly stubborn or old float, a penetrating oil like WD-40 can help loosen tight parts.
For those who like to keep things clean, rubber gloves can protect your hands from grime and bacteria.
Do these optional materials sound like they could make your repair job smoother?
By gathering these tools and materials, you set yourself up for a smooth and efficient repair. You’ll thank yourself later when the water level in your toilet is just right, with no more annoying overflows or weak flushes.
Locating The Toilet Float
Adjusting the toilet float is a simple yet essential part of maintaining a well-functioning toilet. But before you can make any adjustments, you need to locate the float. This component controls the water level in the toilet tank, impacting how effectively your toilet flushes. Understanding where and what type of float your toilet has can make this task much easier. Let’s break it down into manageable steps.
Different Types Of Floats
Toilets can have different types of floats, and recognizing yours is the first step. Common types include ball floats, which are attached to a long arm, and cup floats, which slide along the fill valve. Each functions similarly but looks quite different. Ball floats are large, round, and easily identifiable, while cup floats are more compact and cylindrical. Knowing the type of float helps you understand how it operates and how to adjust it.
Finding The Float
Open the toilet tank lid carefully and set it aside safely. Inside, you’ll see various components, but your focus is the float. Look for a spherical ball or a cylindrical cup attached to the fill valve. The float is usually on the left side of the tank and is connected to a rod or attached directly to the fill valve. Is it easy to spot, or is it hidden among other parts?
Once you locate it, observe how it moves as you flush. This movement controls the water level, so understanding its position is crucial. If it’s a ball float, it will rise with the water and stop filling when it reaches a certain height. If it’s a cup float, it will slide up and down along the fill valve to perform the same function. Can you see how it affects the water level?
Adjusting the float is a straightforward process once you know its type and position. Whether you need to twist a screw or bend a rod, ensuring your float is correctly set can prevent leaks and improve flushing performance. So, are you ready to make your toilet run smoother with a few simple adjustments?
Adjusting A Ball Float
Knowing how to adjust a ball float can save water. It can also prevent toilet overflow. This task is simple and requires no special tools. Follow these steps to ensure your toilet runs efficiently.
Shutting Off The Water
First, locate the shut-off valve. It is usually behind the toilet. Turn the valve clockwise to stop the water flow. This will prevent any mess while you work.
Making The Adjustment
Next, remove the toilet tank lid. Find the ball float inside. It is connected to a long arm. To lower the water level, bend the arm downward. To raise it, bend the arm upward. Adjust it in small increments to avoid drastic changes.
Testing The Adjustment
Turn the water back on by turning the valve counterclockwise. Wait for the tank to fill. Check the water level. It should be about an inch below the overflow tube. If needed, make further adjustments. Test again until the water level is correct.
Credit: www.plumbersstock.com
Adjusting A Cylinder Float
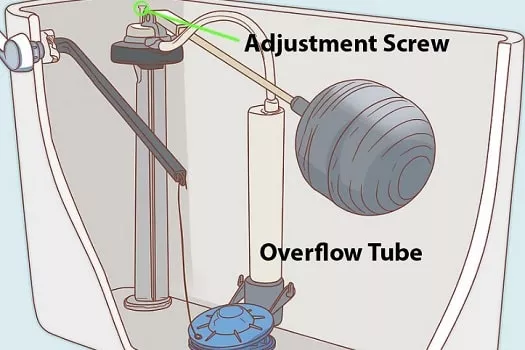
Adjusting a cylinder float in your toilet tank can help control water levels. Simply twist the float adjustment screw to raise or lower the water level. This quick fix ensures efficient flushing and prevents overflows, saving water and reducing utility bills.
Adjusting a cylinder float in your toilet tank can save water. This task ensures efficient flushing. A cylinder float regulates the water level in your toilet tank. It’s vital for preventing overflows and unnecessary water usage. Understanding how to adjust this float can maintain your toilet’s performance.
Shutting Off The Water
Begin by turning off the water supply. Locate the shut-off valve behind the toilet. Turn it clockwise to stop water flow. Ensure no water enters the tank during adjustments. This prevents messes and ensures a dry workspace.
Making The Adjustment
Open the toilet tank lid carefully. Identify the cylinder float, usually a plastic or rubber piece. Look for the adjustment mechanism. Often a screw or clip controls the float height. Turn the screw or adjust the clip to lower or raise the float. Adjust the float until it sits at the desired level. Make small changes and check the position.
Testing The Adjustment
Turn the water supply back on. Allow the tank to fill up. Observe the water level and float position. Ensure the water stops below the overflow tube. Flush the toilet to test the float’s new position. Check for proper flushing and refill without overflow. Adjust again if necessary for optimal performance.
Troubleshooting Common Problems
If you’ve ever dealt with a toilet that isn’t flushing right, you know the frustration. Adjusting the toilet float is usually the first step to fixing the problem. However, sometimes it doesn’t go as smoothly as planned. Let’s dive into some common problems you might face and how to troubleshoot them effectively.
Float Not Adjusting Properly
Have you tried adjusting the float only to find it stubbornly refuses to cooperate? You’re not alone. This issue often arises from a float that’s stuck or worn out. Check if the float moves freely up and down. If it’s sticking, it might need a gentle cleaning or replacement.
Another common culprit is the adjustment screw. Make sure it’s not stripped or worn. A quick fix could be tightening or loosening the screw to find the sweet spot for your float.
Don’t forget the float arm. It should be parallel to the base of the tank. If it’s bent or misaligned, it can prevent proper adjustment. Carefully bend it back into place for smoother operation.
Water Level Issues
Have you noticed the water level in your tank is too high or too low? This can lead to inefficient flushing or constant running water. Start by checking the float height. Adjust it so the water level is about an inch below the overflow tube.
Is the water level stubbornly staying the same despite your adjustments? Inspect the fill valve. It might be clogged or faulty. Cleaning or replacing it can often resolve this issue.
Consider the float type. Some floats are on a ballcock, while others are on a cylinder. Each type adjusts differently. Ensure you’re using the correct method for your float type to achieve the desired water level.
Have you ever tried adjusting the float only to face more issues? Sharing your experiences can help others. What worked for you? What didn’t? Your insights could be the key to someone else’s solution.
Remember, solving these issues can save water and money. What’s your next step to ensure your toilet runs smoothly? Taking action now can prevent more significant problems down the line.

Credit: support.deltafaucet.com
Maintenance Tips
Maintaining your toilet is essential for its smooth operation, and the float is a crucial component in this process. Properly adjusting and maintaining your toilet float can prevent annoying overflows and ensure efficient water usage. Here are some practical tips to keep your toilet float in top shape.
Regular Inspections
Regular inspections of your toilet float can save you from unexpected issues. Make it a habit to check the float every month. Look for any signs of wear or damage that might affect its function.
Ensure the float moves freely without obstruction. If you notice any hindrance, it may be time to adjust or replace parts. A quick inspection can help you spot potential problems early.
Remember, a stitch in time saves nine. A few minutes of inspection can save you hours of repair work later.
Cleaning The Float
Cleaning the float is another crucial maintenance step. Over time, mineral deposits can build up, affecting the float’s performance. Use a gentle cleaner and a soft cloth to wipe away any residue.
Ensure the float is free from grime or buildup. An unclean float can lead to malfunction, causing water wastage or even leaks. Regular cleaning keeps it functioning smoothly.
Have you ever thought about how often you clean your toilet float? Keeping it clean is as important as checking its position. This simple task can extend the life of your toilet components.
By following these maintenance tips, you can ensure your toilet float remains in optimal condition. Regular inspections and cleaning not only save water but also prevent costly repairs. Are you ready to give your toilet the care it deserves?
When To Call A Professional
Adjusting a toilet float seems simple. Yet, some situations need expert help. Understanding when to call a plumber can save time and money. It also prevents further damage to your toilet system. Knowing the right time to call a professional ensures your toilet works efficiently.
Recognizing Major Issues
Not all toilet problems are minor. If the toilet overflows regularly, this signals a deeper issue. Strange noises after flushing point to a possible blockage. Water leaking from the tank is another major concern. These issues often need professional intervention.
A professional plumber can identify and fix such problems. Attempting to fix them yourself may worsen the situation. Recognize these signs early to avoid bigger repair costs.
Choosing The Right Plumber
Choosing the right plumber ensures quality service. Look for experienced and licensed professionals. Check online reviews and ratings. This helps in selecting a reliable service provider. Ask friends or family for recommendations too.
Ensure the plumber offers a warranty for their work. This shows confidence in their service. An honest plumber will provide a clear estimate upfront. Ensure clear communication about the problem and the solution.
Frequently Asked Questions
How Do You Adjust The Float On A Toilet That Keeps Running?
Adjust the toilet float by locating the float arm inside the tank. Turn the adjustment screw to lower the float. This will stop the water from running.
How Do I Adjust The Water Flow In My Toilet?
To adjust the water flow in your toilet, locate the valve behind the toilet. Turn it clockwise to decrease flow or counterclockwise to increase it. For fine-tuning, adjust the float inside the tank. Ensure the water level is about an inch below the overflow tube for optimal performance.
How To Adjust Toilet Fill Valve Water Level?
Turn off the water supply. Adjust the fill valve float by squeezing the clip and sliding it up or down. Turn the water back on and test the flush. Ensure the water level is about an inch below the overflow tube for optimal performance.
What Happens If A Toilet Float Is Too High?
A high toilet float causes the water level to rise too much. This can lead to constant water overflow into the overflow tube, wasting water and increasing utility bills. Adjust the float to the correct height to prevent this issue.
Final Words
Adjusting the toilet float is simple and effective. A well-adjusted float saves water. It also prevents overflows and ensures smooth flushing. Follow the steps carefully. Tackle the problem step by step. Soon, you will have a well-functioning toilet. No more water waste.
No more worries. Enjoy the benefits of a properly adjusted float. Happy plumbing!