Disclosure: This post contains affiliate links and I will be compensated if you make a purchase after clicking through my links. Learn More
Are you tired of dealing with inconsistent water pressure in your home? That sudden blast of water in the shower or the slow trickle from the faucet can be frustrating, right?
A water pressure reducing valve might just be your new best friend. But, what if it’s not set correctly? Understanding how to adjust this crucial valve can make all the difference. In this guide, you’ll discover the simple steps to fine-tune your water pressure to perfection.
Imagine enjoying a consistent, comfortable flow every time you turn on the tap. Ready to learn the secret to a smoother water experience? Let’s dive in and transform your daily routines!

Credit: www.youtube.com
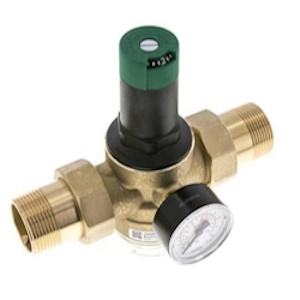
Purpose Of Water Pressure Reducing Valves
Water pressure reducing valves play a crucial role in maintaining the balance and safety of your home’s plumbing system. Ever wondered why your shower sometimes feels like a gentle drizzle or, conversely, a forceful torrent?
The key lies in these nifty devices. They regulate the water pressure flowing into your home, ensuring it’s at a safe and manageable level. But why is this necessary?
At the heart of every plumbing system, water pressure reducing valves are the unsung heroes. Their main purpose is to protect your pipes from damage caused by high water pressure.
Imagine waking up one morning to a burst pipe because the pressure was too high overnight. Not the best way to start your day, right?
They also help in conserving water. By reducing the pressure, you use less water without even noticing it. This means lower utility bills and a smaller environmental footprint. It’s a win-win situation for both your wallet and the planet.
Another benefit is the prolonged lifespan of your appliances. High water pressure can wear out washing machines, dishwashers, and water heaters faster than you might expect. Adjusting the valve can extend the life of these appliances, saving you from costly repairs or replacements.
Why Adjusting Matters
Have you ever thought about the impact of adjusting a water pressure valve? A simple tweak can transform your everyday water usage experience. If your faucets or showerheads are spraying water too aggressively, it might be time to check the valve.
Moreover, adjusting the valve can prevent the annoying noise of water hammering in pipes. That rattling sound when you turn off the faucet can be eliminated with proper pressure management.
Consider how a well-adjusted valve can improve your quality of life. You’ll enjoy consistent water flow and pressure, leading to better showers and smoother daily chores. Isn’t that worth a few minutes of your time?
Practical Tips For Adjustment
- Locate the valve near your main water line. It’s typically found in the basement or utility room.
- Use a wrench to adjust the screw on top of the valve. Turn clockwise to decrease pressure, counterclockwise to increase.
- Test your faucets after each adjustment to find the perfect pressure for your needs.
Remember, always check the manufacturer’s instructions before making adjustments. Each valve can have its unique characteristics. A little patience and understanding go a long way in achieving optimal water pressure.
Have you checked your water pressure reducing valve lately? It might be time to give it some attention and enjoy the benefits it offers.
Credit: tameson.com
Signs Of Incorrect Water Pressure
Low water pressure might indicate a need for valve adjustment. Dripping faucets and slow filling tanks often signal incorrect settings. Adjusting the water pressure reducing valve can restore optimal flow and prevent damage.
Adjusting the water pressure in your home is crucial for maintaining efficient plumbing and avoiding potential damage. But how do you know if your water pressure is incorrect? Recognizing the signs early can save you time, money, and headaches. Let’s dive into some of the key indicators that your water pressure might need adjustment.
Low Water Pressure
Have you ever turned on the shower only to be greeted by a disappointing trickle of water? Low water pressure can be frustrating, especially during your morning routine. It often indicates a problem with your water pressure reducing valve. To fix this, you might need to adjust the valve to allow more water flow.
High Water Pressure
If your faucets spurt and spray when you turn them on, your water pressure could be too high. High water pressure can lead to leaking pipes and increased water bills. Check your pressure gauge; if it’s above 80 psi, it’s time to reduce the pressure. Doing so will protect your pipes and save you money.
Noisy Pipes
Do you hear banging or clanging sounds when using your water fixtures? These noises often mean your water pressure is too high. Known as “water hammer,” these sounds can damage your plumbing over time. Lowering the pressure can reduce these noises and extend the life of your pipes.
Inconsistent Shower Temperature
Ever been surprised by a blast of cold or hot water mid-shower? This inconsistency might be linked to improper water pressure. If your pressure is too low, your water heater might struggle to maintain a steady temperature. Adjusting the valve can help stabilize your shower experience.
Leaking Faucets
A dripping faucet is not just annoying; it’s also a sign of potential water pressure issues. High pressure can wear out washers and seals, causing leaks. By adjusting your valve, you can prevent excessive wear and extend the life of your fixtures.
Is your home experiencing any of these issues? If so, it might be time to take a closer look at your water pressure reducing valve. Adjusting it could be the simple solution you’ve been looking for. Have you checked your water pressure lately?
Tools Needed For Adjustment
To adjust a water pressure reducing valve, basic tools like a wrench and screwdriver are essential. These tools help ensure proper valve adjustment for optimal water pressure control.
Adjusting a water pressure reducing valve can seem daunting, but with the right tools, it becomes a straightforward task. Knowing what equipment you need beforehand can save you time and frustration. Let’s dive into the essential tools that will make your adjustment process smoother.
1. Adjustable Wrench
An adjustable wrench is a must-have in your toolkit. It’s versatile and can fit various sizes of nuts and bolts. This tool will help you easily loosen or tighten the valve’s locknut during the adjustment.
2. Pressure Gauge
A pressure gauge is crucial for measuring the water pressure accurately. Without it, you’re left guessing the pressure level. Attach it to a hose bib near the valve to get a precise reading. Ensure the gauge reads in PSI (pounds per square inch) for consistency.
3. Screwdriver
A flathead screwdriver is often needed for fine-tuning the valve. Some valves have an adjustment screw that requires a screwdriver to turn. Keep one handy to make small adjustments until you reach your desired pressure.
4. Plumber’s Tape
Also known as Teflon tape, this is essential for sealing threaded connections. It prevents leaks and ensures a tight seal. Wrap it around the threads before reassembling any parts to maintain water-tight integrity.
5. Safety Gear
Don’t overlook safety. Wear protective eyewear to shield against any splashes. Gloves can provide extra grip and protect your hands from sharp edges. — I once underestimated the importance of a pressure gauge. I tried adjusting my valve without it and ended up with fluctuating shower pressure.
After getting a gauge, I realized how off my settings were. Have you ever tried tackling a task without the right tools? It can lead to unexpected challenges. Being prepared with these tools not only makes the adjustment process more efficient but also saves you from potential mishaps.
Remember, the right tools are half the job done. Are there any other tools you find indispensable for home repairs? Share your thoughts!
Step-by-step Adjustment Guide
Adjusting a water pressure reducing valve might seem daunting. But it’s quite simple. This guide will walk you through each step. Follow along to ensure a smooth adjustment process.
Locating The Valve
First, find the water pressure reducing valve. It’s usually near the water meter. Look for a bell-shaped device with a screw at the top. Knowing its location is crucial for adjustment.
Preparing The Area
Clear the surrounding area of any obstructions. This ensures easy access to the valve. Use a flashlight if the space is dimly lit. Proper visibility is key.
Turning Off Water Supply
Turn off the main water supply. This prevents water flow during adjustment. Locate the shut-off valve and turn it clockwise. This step ensures safety and precision.
Adjusting The Pressure
Use a wrench to loosen the locknut on the valve. Turn the adjustment screw to change pressure. Clockwise increases pressure, counterclockwise decreases it. Make small turns for accuracy.
Testing The Adjustment
Turn the main water supply back on. Check the water pressure using a gauge. Ensure it meets your desired level. Make further adjustments if needed. Repeat until satisfied with the pressure.
Common Mistakes To Avoid
Adjusting a water pressure reducing valve can seem straightforward. But, it’s easy to make mistakes that can lead to problems. Understanding common errors helps avoid costly repairs and ensure proper function. Here, we discuss some frequent mistakes to watch out for.
1. Incorrect Pressure Settings
Many set the valve pressure too high or too low. This can lead to pipe damage or insufficient water flow. Always check the recommended pressure for your home.
2. Ignoring Regular Maintenance
Neglecting regular checks can cause the valve to malfunction. Dirt and debris can build up, affecting performance. Schedule routine inspections to keep the valve working well.
3. Using The Wrong Tools
Improper tools can damage the valve. Always use the recommended tools for adjustment. This ensures a precise fit and avoids unnecessary wear.
4. Over-tightening The Valve
Tightening the valve too much can cause leaks. It can also damage threads and seals. Adjust the valve gently to the correct setting.
5. Failing To Test After Adjustment
Always test the water pressure after making adjustments. This ensures the settings are correct. Skipping this step can lead to unnoticed issues.
6. Not Consulting The Manual
Each valve model might have specific instructions. Failing to read the manual can result in improper adjustments. Always refer to the manufacturer’s guide for accurate information.
Maintenance Tips
Regular maintenance of your water pressure reducing valve ensures optimal performance. Proper care prevents costly water damage and prolongs the valve’s lifespan. Follow these simple tips to keep your valve functioning smoothly.
Check For Leaks
Inspect the valve regularly for any visible leaks. Leaks can indicate a problem that needs fixing. Tighten any loose connections to stop dripping. If leaks persist, consider replacing the valve.
Test Water Pressure
Measure the water pressure using a pressure gauge. Attach the gauge to an outdoor faucet for an accurate reading. Ensure the pressure remains within the recommended range, usually 40-60 psi.
Clean The Valve
Over time, debris can accumulate in the valve. Clean the valve to remove any sediment or buildup. Turn off the water supply before disassembling the valve for cleaning.
Lubricate Moving Parts
Lubricate the valve’s moving parts to ensure smooth operation. Use a silicone-based lubricant for best results. This helps reduce friction and wear on the components.
Inspect For Corrosion
Check the valve for any signs of corrosion. Corrosion can weaken the valve and lead to failures. If you notice rust or corrosion, it might be time to replace the valve.
Adjust The Valve
Adjust the valve settings if necessary to maintain proper pressure. Turn the adjustment screw to increase or decrease the pressure. Check the manual for specific instructions related to your valve model.
When To Call A Professional
Adjusting a water pressure reducing valve can seem simple, yet complications may arise. Knowing when to call a professional is crucial. While DIY solutions might work temporarily, expert intervention guarantees safety and long-term effectiveness. This section outlines key scenarios indicating professional help is needed.
Leakage Or Persistent Drips
If the valve leaks or drips consistently, it signals a problem. Ignoring leaks can lead to water damage. A professional can assess and fix the issue correctly. Their experience ensures no further complications develop.
Unusual Noises
Strange sounds, like banging or whistling, might occur during adjustment. These noises often indicate internal issues. Professionals have the tools and knowledge to diagnose and resolve the problem efficiently. Attempting to fix it on your own could worsen the situation.
Fluctuating Water Pressure
Inconsistent water pressure is frustrating and might damage appliances. Expert evaluation identifies the cause and prevents future fluctuations. Professionals ensure adjustments are precise and effective. This safeguards both your plumbing system and household appliances.
Complex Valve Design
Some valves are complex, with intricate designs. Adjusting them requires specialized knowledge. Professionals understand various valve types and their mechanisms. Attempting adjustments without proper understanding may lead to costly mistakes. Their expertise guarantees the valve functions optimally.
Old Or Damaged Valves
Older valves might be worn out or damaged. These valves require careful handling. Professionals can determine if repair or replacement is needed. Their assessment ensures the system works correctly and safely.
:max_bytes(150000):strip_icc()/Water-pressure-regulator-2718696_color-8cb88034226e4c43aae61588c648e23f.jpg)
Credit: www.thespruce.com
Frequently Asked Questions
How Do I Know If My Water Pressure Is Too High?
High water pressure can cause leaks and damage pipes. Check with a pressure gauge. Optimal range: 40-60 PSI.
Can I Adjust The Valve Myself Safely?
Yes, with care. Turn the adjustment screw slowly. Check pressure with a gauge after each turn.
What Tools Are Needed For Adjusting The Valve?
You need a wrench and a pressure gauge. These tools help ensure accurate and safe adjustment.
Final words
Adjusting your water pressure reducing valve is important for home plumbing. Properly set pressure prevents leaks and ensures comfortable water flow. Keep tools handy for adjustments. Regular checks can save money on repairs. Always follow instructions for safe changes. Consult a professional if unsure about the process.
Remember, correct settings enhance your home’s water system. Stay proactive with maintenance to avoid unexpected issues. Your plumbing system works best when pressure is balanced. Embrace simple steps for better home efficiency. Enjoy peace of mind with well-managed water pressure.

