Disclosure: This post contains affiliate links and I will be compensated if you make a purchase after clicking through my links. Learn More
Are you concerned about the safety and cleanliness of your water supply? Ensuring that your water is free from harmful bacteria is crucial for the health and well-being of your household.
If you’re looking to safeguard your family and improve the quality of your water, learning how to chlorinate water pipes is an essential step. In this guide, you’ll discover a straightforward method to effectively disinfect your water system, giving you peace of mind and a healthier home environment.
Imagine the relief of knowing that each drop of water you use is safe and clean. Dive in to explore this vital process and take control of your water quality today.
Preparation Steps
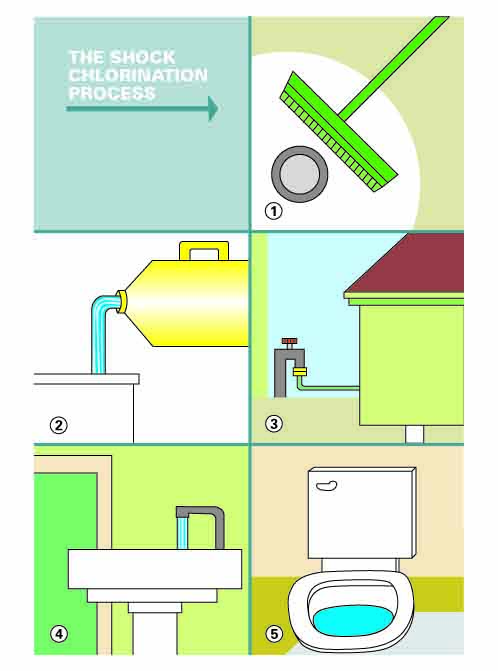
Chlorinating water pipes begins with turning off the main water supply. Next, drain all taps to clear the pipes. Finally, introduce a chlorine solution to disinfect the system.
Chlorinating water pipes is crucial for maintaining clean water systems. Before starting the chlorination process, proper preparation is essential. It ensures effective treatment and safety. Follow these preparation steps for a smooth chlorination process.
Gather Necessary Tools
Collect all required tools and materials. You will need chlorine solution, measuring cups, and protective gloves. Have a funnel ready for pouring liquids. A wrench might be needed to access pipes. Ensure you have a clean bucket for mixing solutions. Double-check your list to avoid missing items.
Ensure Safety Precautions
Safety is paramount during chlorination. Wear protective gloves to prevent skin contact with chlorine. Use goggles to shield your eyes from splashes. Make sure the area is well-ventilated. Avoid inhaling fumes. Keep children and pets away from the work area. Have a first aid kit nearby for emergencies.
Turn Off Water Supply
Locate the main water valve in your home. Turn it off to stop water flow. This prevents dilution of the chlorine solution. Confirm the water is completely shut off. Check faucets to ensure no water runs. Turning off the supply is crucial for effective pipe treatment.
Mixing Chlorine Solution
Chlorinating water pipes ensures safe drinking water by killing harmful bacteria. Start by mixing a chlorine solution. Use this mixture to clean and disinfect the pipes effectively.
Mixing chlorine solution is a crucial step in chlorinating water pipes. It ensures effective disinfection and safe water supply. The right mix maintains the balance between safety and efficiency. The process requires careful attention to detail. Ensuring the correct proportion of chlorine is vital for successful pipe chlorination.
Select Appropriate Chlorine Type
Choosing the right chlorine type is essential for effective disinfection. Liquid chlorine is commonly used for its ease of application. Powdered chlorine can be an alternative if liquid is unavailable. Verify that the chlorine is suitable for potable water. Check labels for any specific instructions or restrictions.
Calculate Correct Dosage
Accurate dosage calculation is key. Determine the volume of water in the pipes. Use precise measurements to avoid over or under chlorination. Follow guidelines for concentration levels. Proper dosage ensures safety and effectiveness.
Prepare Solution Safely
Safety is a priority when preparing the chlorine solution. Use protective gear like gloves and goggles. Mix the solution in a well-ventilated area. Follow the instructions on the chlorine packaging. Avoid inhaling fumes during preparation. Always prioritize safety for yourself and others.
Applying Chlorine Solution
Chlorinating water pipes involves adding a chlorine solution to kill bacteria and ensure safe drinking water. Mix chlorine with water, flush the pipes, and let it sit for the recommended time. This process cleans the system effectively, maintaining water quality and safety.
Applying a chlorine solution to water pipes is a crucial step in ensuring clean and safe drinking water. Whether you’re maintaining a home system or part of a community service, understanding this process is essential. Let’s dive into the practical steps involved in effectively chlorinating your water pipes.
Introduce Chlorine Into Pipes
Begin by determining the right amount of chlorine needed for your system. The concentration depends on the volume and the severity of contamination. Once you have the correct amount, dissolve it in water to create a chlorine solution.
Using a funnel or pump, introduce the solution into the main water line. I remember the first time I chlorinated my pipes; the feeling of ensuring my family’s safety was worth every effort.
Monitor Flow And Distribution
After introducing the chlorine solution, it’s crucial to ensure it flows evenly throughout the plumbing system. Turn on taps and faucets one by one, starting from the nearest to the furthest from the point of entry.
This ensures the solution reaches all parts of the system. Check for any unusual resistance or blockages, as these could hinder the distribution. Are you noticing an even flow? If not, adjust the water pressure accordingly.
Ensure Complete Coverage
Allow the chlorine solution to sit in the pipes for a recommended time, usually a few hours, to maximize its effectiveness. During this time, avoid using the water for drinking or cooking. Test the water at different outlets to ensure the presence of chlorine, confirming it has reached every corner.
If you notice any areas with weaker chlorine presence, consider repeating the process for those sections. How confident are you in the thoroughness of your chlorination? Double-checking now can save potential issues later.
Engage with these steps, and you’ll maintain a healthy water system. Regular chlorination not only ensures safety but also peace of mind.
Credit: extension.uga.edu
Waiting Period
The waiting period is crucial in the chlorination process of water pipes. It ensures effective disinfection. During this time, chlorine interacts with bacteria and impurities. This helps achieve the desired sanitation level. Understanding the waiting period’s importance enhances water safety. Let’s explore how long it takes and what influences it.
Duration Of Contact Time
Contact time varies based on chlorine concentration. Higher concentrations reduce waiting time. Typically, pipes need at least 12 hours. This duration guarantees complete disinfection. Longer contact times are often recommended for thorough sanitation. Always follow guidelines for specific pipe systems.
Factors Influencing Wait Time
Several factors affect the wait time during chlorination. Pipe material plays a significant role. Some materials absorb chlorine faster. Water temperature impacts chlorine activity.
Warmer temperatures accelerate the process. Bacteria levels in pipes also influence waiting time. Higher contamination requires longer exposure. Always consider these factors for optimal results.
Flushing The System
Clearing water pipes with chlorine ensures clean drinking water. Follow the steps to safely chlorinate your system, eliminating bacteria and impurities. Regular maintenance keeps pipes hygienic and water safe for everyday use.
Flushing the system is a critical step when chlorinating water pipes. It’s like hitting the refresh button on your water lines, ensuring that your water is safe and clean. It’s not just about getting rid of the chlorine taste; it’s about making sure your water is free from any unwanted residues. Have you ever noticed an odd taste or smell in your tap water? Flushing might just be the solution you need.
Remove Residual Chlorine
To start, open all the taps in your home, including outdoor faucets. Let the water run until you can no longer smell chlorine. This might take a few minutes or longer, depending on the size of your system.
If you’re unsure, try running the water in 5-minute intervals. It’s a simple way to ensure every drop of chlorine is out of your pipes. Remember, patience is key here.
Check Water Clarity
Once you think the chlorine is gone, look at the water. Is it clear? Cloudy water can indicate that there’s still some cleaning to do. Sometimes small particles can linger, especially in older pipes. If you see any discoloration or cloudiness, keep flushing until the water runs crystal clear.
Verify Chlorine Levels
Finally, test the water to make sure all chlorine has been removed. You can use a simple chlorine test kit available at most hardware stores. Testing only takes a few minutes and gives you peace of mind. If the test shows chlorine, continue flushing and test again until the levels are safe.
Have you ever wondered how often you should check your water quality? Regular checks can prevent future issues and keep your water fresh. It’s a small effort that makes a big difference in your daily life.
Testing Water Quality
Testing water quality is crucial in the chlorination process. It ensures the effectiveness of the treatment and safety of the water. Regular testing helps identify contaminants and maintain healthy water systems.
Use Of Testing Kits
Testing kits make water quality checks straightforward. They provide essential tools to measure chlorine levels. These kits contain strips, reagents, and instructions. Ensure you follow guidelines for accurate results.
Interpreting Results
Understanding test outcomes is vital. Look for chlorine concentration levels. Safe levels should be between 0.2 and 0.5 mg/L. Results outside this range indicate adjustments are needed.
Addressing Potential Issues
Results might show issues like low chlorine levels. This can lead to bacterial growth. High levels cause a chlorine taste. Adjust chlorine dosage to maintain balance. Regular checks prevent long-term problems.
Maintenance Tips
Maintaining clean water pipes is crucial for safe drinking water. Regular chlorination keeps pipes free from harmful bacteria. Here are some tips to ensure your water pipes remain in optimal condition.
Regular Inspection
Inspect water pipes every month. Check for leaks and corrosion signs. Early detection prevents serious damage. Look for discoloration around fittings. Use a flashlight for better visibility. Ensure pipes are securely fastened. Loose pipes can lead to leaks.
Scheduling Routine Chlorination
Plan chlorination every six months. Regular treatment keeps bacteria at bay. Follow manufacturer guidelines for chlorine use. Use appropriate safety gear during chlorination. Ensure proper ventilation in the area. Schedule chlorination during low water usage times. This minimizes water contamination risks.
Addressing Common Problems
Address leaks immediately to prevent water loss. Replace damaged sections promptly. Use quality materials for repairs. Check for unusual odors or tastes in water. These may indicate contamination. Remove mineral deposits from pipes regularly. This ensures smooth water flow.

Credit: www.robinsplumbing.com
Frequently Asked Questions
How Do I Safely Chlorinate Water Pipes?
Start by shutting off water supply. Add chlorine solution to the pipes. Flush until clear.
What Is The Purpose Of Chlorinating Pipes?
Chlorination kills bacteria. It cleans pipes. Ensures safe water. Essential for health.
How Long Should Chlorine Sit In The Pipes?
Let chlorine sit for 12 to 24 hours. Then, flush pipes thoroughly with clean water.
Can I Use Household Bleach For Chlorination?
Yes, you can use unscented bleach. Use proper dilution. Follow safety guidelines for effective results.
Final Words
Maintaining clean water pipes is essential for safe drinking water. Chlorinating pipes helps eliminate bacteria and impurities. Follow proper steps for effective chlorination. Use the correct chlorine amount for your pipe size. Ensure thorough flushing after treatment. This keeps water safe for use.
Regular maintenance can prevent future issues. Clean pipes mean healthier water. Remember, clean water is vital for health. Keep your home water system in top shape. Feel confident with fresh, clean water every day. Stay safe, stay healthy.

