Disclosure: This post contains affiliate links and I will be compensated if you make a purchase after clicking through my links. Learn More
Are you tired of the weak water pressure from your old showerhead? Does the thought of a luxurious, refreshing shower entice you?
Installing a new showerhead might just be the upgrade your bathroom needs. The best part? You can do it yourself! You don’t need to be a plumbing expert to transform your shower experience. With just a few simple steps, you can enhance your daily routine and add a touch of spa-like comfort to your home.
Imagine stepping into a shower that feels like a gentle waterfall, perfectly tailored to your liking. Intrigued? Keep reading, and we’ll guide you through the quick and easy process of installing a new showerhead, so you can start enjoying your invigorating showers sooner than you think.
Credit: www.youtube.com
Tools And Materials Needed
Installing a new showerhead is a simple task that can transform your daily routine. It doesn’t require a professional plumber, and you can do it yourself with the right tools and materials. You might be surprised at how few items you actually need, and many of them you probably already have at home. Let’s dive into the essentials for this DIY project.
Basic Tools You Need
First, make sure you have a wrench. An adjustable wrench is ideal because it can fit various sizes of nuts and bolts. You’ll use it to unscrew the old showerhead and secure the new one. Be gentle though, as excessive force might damage the pipe.
Next, you’ll need some pliers. They’re handy for gripping and turning stubborn parts. If your old showerhead is stuck, pliers can help twist it loose without much struggle.
Essential Materials
Teflon tape is a must. It helps create a watertight seal and prevents leaks. Wrap it around the threads of the shower arm before attaching the new showerhead. A few layers are usually enough to ensure a secure fit.
Have a cleaning cloth ready. Before installing the new showerhead, clean the threads on the shower arm. A simple wipe can remove any debris or old tape remnants, ensuring a clean surface for the new installation.
Optional Extras
If you’re keen on a polished finish, consider a soft cloth or rag. After installation, use it to buff the showerhead, removing fingerprints or smudges for a pristine look.
Some people prefer to use a pipe thread compound instead of Teflon tape. It serves the same purpose but might offer a bit more durability. If you have some lying around, it’s worth considering.
Do you have all these items handy, or will you need a trip to the hardware store? With these tools and materials, you’ll be ready for a smooth installation process.
Are there any unexpected challenges that could arise? Share your thoughts or experiences in the comments below!
Choosing The Right Showerhead
Choosing the right showerhead can transform your daily routine into a refreshing experience. With the variety available today, it’s essential to know what fits your needs best. You’ll want to consider factors like water pressure, design, and functionality. Let’s break down the options to ensure you make the right choice for your bathroom.
Evaluate Your Water Pressure
Before picking a showerhead, check your home’s water pressure. Some showerheads require higher pressure to function effectively. If your water pressure is on the lower side, opt for models designed to enhance flow, like aerated showerheads. Have you ever felt disappointed with a weak shower? The right choice can prevent that.
Consider The Type Of Showerhead
There are multiple types, including handheld, rain, and fixed. Handheld showerheads offer flexibility and are great for cleaning or rinsing. Rain showerheads provide a spa-like experience, whereas fixed ones are budget-friendly and easy to install. Imagine the luxury of a rain shower after a long day!
Look At The Features
Modern showerheads come with various features like adjustable spray patterns and water-saving technologies. Do you value versatility? Adjustable settings let you switch from a gentle mist to a powerful spray. Some models even have LED lights for a unique shower experience.
Think About Design And Material
Your showerhead should complement your bathroom’s decor. Chrome and stainless steel are popular for their durability and sleek look. Have you ever considered how a matte black finish could add a touch of elegance? Choose a design that reflects your style and stands the test of time.
Budgeting For Your Showerhead
Prices can vary significantly, so setting a budget is crucial. Are you looking for a high-end model or something more economical? It’s possible to find quality options at every price point. Remember, investing in a good showerhead can enhance your daily comfort.
By considering these factors, you can select a showerhead that matches your needs and enhances your bathroom experience. What will your choice say about your style and comfort preferences?
Removing The Old Showerhead
Removing the old showerhead is the first step in upgrading your shower. With the right tools, this task is simple and quick. Follow these steps to ensure a smooth process. You’ll need some basic tools and a little patience.
Turning Off The Water Supply
First, turn off the water supply to the shower. Locate the valve, which is usually near the bathroom. Turn it clockwise to stop the water flow. This prevents leaks and ensures safety during installation.
Unscrewing The Old Fixture
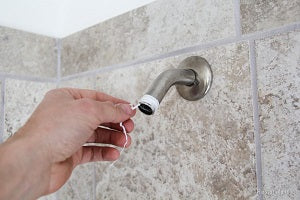
Next, prepare to unscrew the old showerhead. Use a wrench or pliers for this task. Hold the shower arm steady with one hand. With the other hand, turn the showerhead counterclockwise. If it’s stuck, apply a bit more force, or use a cloth for better grip.
Once loose, remove it completely. This clears the path for your new, stylish showerhead.
Preparing For Installation
Preparing for the installation of a new showerhead is crucial. This ensures a smooth and successful process. Before starting, gather all necessary tools and materials. This includes a wrench, plumber’s tape, and a cloth. Proper preparation can save time and prevent potential issues. Below are key steps to get ready for installing a new showerhead.
Cleaning The Shower Arm
Start by cleaning the shower arm. This removes dirt and debris. Use a damp cloth to wipe the surface. Check for rust or damage. If needed, apply a gentle cleaner. Ensure the shower arm is dry before proceeding. A clean surface helps the new showerhead fit properly.
Applying Plumber’s Tape
Next, apply plumber’s tape to the shower arm threads. This helps prevent leaks. Wrap the tape around the threads two or three times. Ensure the tape is tight and smooth. Avoid overwrapping, as it may cause issues. Plumber’s tape creates a secure seal for your new showerhead.
Installing The New Showerhead
So, you’ve decided to upgrade your shower experience by installing a new showerhead. Fantastic choice! A new showerhead can make a world of difference, transforming your daily routine into a spa-like experience. But how do you actually get that new fixture up and running? With the right steps, you can have it installed in no time, even if you’re not particularly handy.
Attaching The New Fixture
First, make sure the old showerhead is completely removed, leaving only the bare shower arm. Hold your new showerhead in hand. Does it come with an attached washer or rubber gasket? If not, check the packaging, as these are essential for preventing leaks.
Screw the new showerhead onto the shower arm. Do it by hand initially to avoid cross-threading. Once it feels secure, tighten it with a wrench. Be careful not to over-tighten, as this can damage the fixture or the arm.
Ensuring A Tight Seal
Ensuring a tight seal is crucial to avoid those annoying drips. Use plumber’s tape if your showerhead didn’t come with a washer. Wrap the tape clockwise around the threads of the shower arm two to three times.
Test the seal by turning on the water. Observe if there are any leaks at the connection point. If you spot water escaping, slightly tighten the connection and test again.
Are you experiencing issues? Re-check the washer and plumber’s tape. A small adjustment can make a huge difference in performance.
Feeling accomplished yet? You’ve just tackled a home improvement task that enhances your daily life! What other small upgrades can you make around the house?

Credit: www.youtube.com
Testing The Installation
Ensure the new showerhead works properly by turning on the water. Check for leaks around the connections. Adjust the spray settings for optimal performance.
Testing the installation of your new showerhead is a crucial step to ensure everything is working perfectly. You might be excited to test the luxurious spray of your new fixture, but hold on a moment. Ensuring your installation is leak-free and functions as intended will save you from potential water damage and additional repairs down the line. Let’s walk through the final steps to guarantee your new showerhead is ready for use.
Turning On The Water Supply
First things first, you’ll need to turn the water supply back on. Locate your bathroom’s main water valve, usually found near the shower or under the sink. Turn it clockwise to open it fully. As the water rushes through the pipes, listen carefully. Do you hear any unusual noises? A smooth, silent flow is what you’re aiming for. This step is a bit like waiting for a pot of water to boil. It might seem long, but patience ensures everything is in order.
Checking For Leaks
Once the water is on, take a moment to inspect your handiwork. Look closely at the connection points between the showerhead and the pipe. If you notice any water droplets forming, it indicates a leak. Tighten the showerhead slightly with your hands or a wrench. Sometimes, a little adjustment is all it takes to fix the issue. Have you considered using plumber’s tape around the threads before attaching the showerhead? This simple step can prevent leaks effectively.
Remember, leaks can waste water and lead to higher bills. So, it’s worth spending a few extra minutes ensuring everything is sealed tight. Testing your installation might seem like a minor task, but it’s the final touch that makes your DIY project truly successful. Have you ever thought about how satisfying it feels to know your efforts have paid off? Now, you’re ready to enjoy your new shower experience!
Troubleshooting Common Issues
Installing a new showerhead can transform your bathroom experience, but it’s not always smooth sailing. You may encounter some common issues during installation. Don’t worry—most problems have simple solutions. Whether you’re dealing with water pressure woes or pesky leaks, this guide will help you troubleshoot and resolve these issues effectively.
Fixing Water Pressure Problems
Has your shower turned into a gentle trickle? Low water pressure can be frustrating. First, check if the showerhead’s flow restrictor is the culprit. Many new models include a small plastic piece designed to conserve water. If your water pressure is too low, remove this restrictor for a better flow.
Sometimes, mineral deposits build up inside the showerhead, blocking water flow. Soaking the showerhead in vinegar can dissolve these deposits. Make sure you rinse thoroughly afterward. If you’ve tried these steps and still face issues, consider the water pressure in your home overall. Could it be a problem with your plumbing system?
Addressing Leaks
Is your showerhead dripping even when the water’s off? Leaks can be annoying and wasteful. A common cause is loose connections. Double-check that the showerhead is tightly screwed onto the shower arm. You might need to use a wrench, but be careful not to over-tighten.
If the problem persists, the issue could be a worn-out washer. These small rubber rings inside the showerhead provide a seal. Replacing a damaged washer is inexpensive and can stop the leak. Have you checked the teflon tape on the threads? Sometimes adding a fresh layer can make all the difference.
What if you’ve tried everything and the leak persists? Could the shower arm be cracked or faulty? Exploring these possibilities might lead you to the solution.
Remember, troubleshooting is part of the process. Embrace the challenge—you’ll not only learn more about your plumbing system but also gain confidence in tackling home improvement tasks.
Maintenance Tips
Maintaining your showerhead is crucial for its longevity. Regular care ensures optimal performance. It also prevents issues like clogging and mineral buildup. Simple maintenance can keep your showerhead clean and functioning well.
Cleaning The Showerhead
Remove mineral deposits with vinegar. Soak the showerhead in a vinegar solution. This dissolves hard water stains effectively. Rinse thoroughly with water afterward.
Inspecting For Leaks
Check for any leaks regularly. Leaks reduce water pressure. Tighten any loose connections to prevent leakage. Replace washers if needed.
Maintaining Water Pressure
Keep water pressure optimal for a pleasant shower. Clean the showerhead openings to ensure proper flow. A needle can help remove debris from the holes.
Preventing Corrosion
Corrosion can damage the showerhead. Dry the showerhead after use. This prevents moisture from causing rust. Consider using a protective coating.
Replacing Worn Parts
Worn parts affect performance. Replace them promptly. Check washers and seals regularly. They often wear out first.
Credit: aromasenseusa.com
Frequently Asked Questions
How Do I Choose The Right Showerhead Size?
Measure your current shower arm. Match it with the new showerhead size. Consider water pressure and features.
Can I Install A Showerhead Without Tools?
Yes, most showerheads are hand-tightened. Check for washers. Ensure a snug fit to prevent leaks.
What Steps Ensure Proper Showerhead Installation?
Clean threads first. Apply plumber’s tape. Attach showerhead. Tighten securely. Test for leaks and adjust as needed.
How Often Should I Replace My Showerhead?
Replace every 6-10 years. Check for reduced water flow. Consider newer models for better efficiency.
Final Words
Installing a new showerhead is simple and rewarding. With these steps, you save time and money. Enjoy a refreshing shower experience in your own home. No need for complex tools or skills. Most people can easily complete this task in an afternoon.
Remember, a good showerhead makes a big difference. It improves water flow and comfort. Now, step into your upgraded shower and relax. Feel proud of the work you accomplished. Your bathroom feels more inviting and functional. Enjoy your new showerhead every day!

