Disclosure: This post contains affiliate links and I will be compensated if you make a purchase after clicking through my links. Learn More
Are you tired of fumbling around for the toilet paper roll in your bathroom? Installing a toilet paper holder on your drywall can transform this everyday hassle into a seamless experience.
Imagine never having to worry about where to find the toilet paper again! With this quick and easy guide, you’ll learn how to install a toilet paper holder that not only serves its purpose but also enhances your bathroom’s aesthetics.
You’ll save time and avoid frustration, all while adding a touch of convenience to your home. So, grab your tools and get ready to make a simple change that will have a big impact. Keep reading to discover the step-by-step process and ensure your bathroom is both functional and stylish.
Choosing The Right Spot
Select a spot free from obstructions like cabinets or towel bars. Ensure it’s within easy reach when seated. Use a stud finder to locate support for a secure installation.
Choosing the right spot for your toilet paper holder might seem trivial, but it can significantly impact the functionality and comfort of your bathroom. A poorly placed holder can lead to awkward bathroom situations, while a well-positioned one can enhance convenience. Let’s explore how to find that perfect spot by considering height recommendations and accessibility.
Height Recommendations
Installing your toilet paper holder at the right height is crucial for comfort. The standard recommendation is to place it about 26 inches above the floor. This height ensures easy reach without bending or stretching awkwardly. But think about the users in your household. Are there kids who might struggle with a higher placement? Adjust accordingly to make sure everyone can easily grab a sheet without fuss.
Accessibility Considerations
Accessibility is all about making sure your toilet paper holder is within easy reach for everyone. Consider positioning it within a comfortable arm’s reach from the toilet. You don’t want anyone having to lean too far or twist uncomfortably. Do you have elderly family members or individuals with mobility challenges? If so, you might need to customize the placement further to meet their needs.
This attention to detail can transform their daily bathroom experience from troublesome to effortless. As you ponder these factors, ask yourself: How can you make this small adjustment truly cater to your household’s unique needs?
Credit: www.homedepot.com
Marking The Position
Marking the position is a vital step in installing a toilet paper holder on drywall. Proper placement ensures easy access and adds to the bathroom’s aesthetics. A poorly placed holder can lead to inconvenience and might require adjustments later. Follow these simple steps to mark the perfect position for your toilet paper holder.
Using A Level
Start by selecting the spot where you want the holder. Hold the holder against the wall. Use a level to ensure it is straight. A level helps avoid a crooked installation. Balance the level’s bubble in the center. This guarantees the holder is aligned perfectly.
Ensuring Proper Alignment
Proper alignment is crucial for functionality. Think about the height from the floor. Consider the distance from the toilet. Too high or too far can be inconvenient. Mark the spot lightly with a pencil. Double-check the alignment with the level. Ensure it’s easy to reach and use.
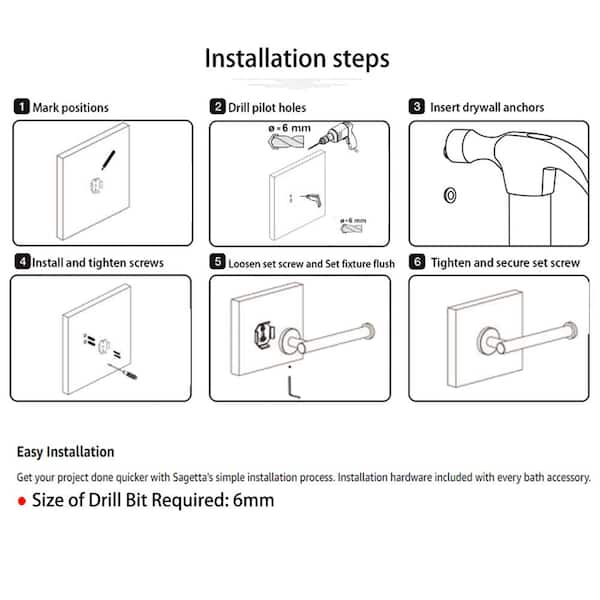
Drilling Pilot Holes
Drilling pilot holes ensures a secure fit for a toilet paper holder in drywall. This step prevents cracks and supports stability. Always use the correct drill bit size for precise holes.
Drilling pilot holes is crucial for installing a toilet paper holder in drywall. It ensures stability and prevents damage. Let’s dive into the essentials for this task.
Selecting The Drill Bit
Choosing the right drill bit is essential. Start with a bit that matches the size of your anchor. A bit too large can cause the anchor to fall out. A bit too small may not allow the anchor to fit properly. Standard drywall anchors typically require a 1/4 inch drill bit. Always check the anchor package for specific size recommendations. Using the correct bit prevents unnecessary damage to your wall.
Avoiding Electrical Wires
Safety first. Before drilling, ensure there are no electrical wires behind the wall. Use a stud finder with wire detection capabilities. These devices help identify wires hidden in the wall. Mark safe zones where no wires exist. Avoid drilling near light switches or outlets. They often indicate the presence of electrical wiring. Ensuring the area is free from wires prevents electrical hazards.

Credit: www.youtube.com
Installing Wall Anchors
Installing a toilet paper holder on drywall requires wall anchors. They provide support and prevent damage. Proper installation ensures your holder stays secure. Let’s dive into the process.
Types Of Wall Anchors
Choosing the right wall anchor is vital. There are several types to consider. Plastic expansion anchors are the most common. They are easy to use and affordable. Toggle bolts offer more support. They are great for heavier items. Molly bolts are another option. They expand behind the wall for added strength. Each type has its own benefits. Select the one that suits your needs best.
Inserting Anchors Properly
Proper insertion is crucial for stability. Start by drilling a hole in the drywall. The hole should match the anchor size. Insert the anchor into the hole. Push it until it’s flush with the wall. For toggle bolts, fold the wings before insertion. Tighten the bolt to secure the anchor. For plastic anchors, use a screwdriver to expand them. Ensure the anchor is snug and secure. This provides a strong base for your toilet paper holder.
Attaching The Holder
Attaching the holder requires careful placement on drywall. Begin by marking the spot with a pencil. Drill holes for anchors to support the toilet paper holder securely.
Installing a toilet paper holder in drywall might seem daunting, but it’s simpler than you think. Once you’ve chosen the perfect spot, it’s time to attach the holder securely. Whether you’re a DIY enthusiast or just tackling this task for the first time, you’ll find that attaching the holder is a straightforward process. Just follow these steps, and you’ll have your new fixture up in no time.
Securing With Screws
Begin by aligning the holder’s mounting bracket with the pencil marks you made earlier. Hold it firmly against the wall. Using a drill, insert the screws through the bracket holes into the drywall. If your kit includes drywall anchors, use them for extra stability. As you tighten the screws, ensure they’re snug but not overly tight to avoid damaging the drywall. The holder should feel firm against the wall.
Checking Stability
Once the holder is attached, give it a gentle tug. Does it feel secure? If you notice any wobbling, you might need to adjust the screws or add an additional anchor. Stability is key to a functional holder. What’s your experience with DIY projects? Have you found that taking a moment to double-check your work saves you hassle later? Testing the holder’s stability now can prevent future mishaps. Ensuring your toilet paper holder is properly attached not only adds to the functionality but also enhances the bathroom’s aesthetic. With these steps, you’re well on your way to mastering another home improvement task.
Final Adjustments
Final adjustments ensure your toilet paper holder is secure and aligned. These last steps refine the installation and perfect the holder’s fit. Pay attention to detail for a polished look.
Aligning The Holder
Check the holder’s position against your pencil marks. Ensure it is straight and level. Use a small level to verify alignment. Adjust the holder slightly if needed. Precision here prevents crooked installation.
Tightening Screws
Use a screwdriver to tighten each screw. Do not overtighten to avoid wall damage. Ensure screws are secure but not overly tight. This ensures the holder stays firmly in place. Test the holder by pulling gently. It should not wobble or shift.
Tips For Maintenance
Maintaining a toilet paper holder in drywall requires regular attention. This ensures it remains secure and functional. Small tasks can keep your holder in top shape for years. Let’s explore some helpful tips.
Regular Checks
Inspect your toilet paper holder monthly. Look for any loose screws or brackets. Tighten them immediately if needed. This prevents the holder from falling or causing damage. Regular checks ensure the holder remains stable.
Avoiding Overloading
Do not overload the holder with extra rolls. It is designed for a specific weight. Exceeding this can cause it to loosen from the wall. Use the holder as intended. This simple habit extends its lifespan.
Final Words
Installing a toilet paper holder in drywall is simple and rewarding. Follow the steps carefully, and your bathroom will look neat. Gather your tools and materials beforehand. Measure accurately to avoid mistakes. Use anchors for better support. Remember, the holder should be at a convenient height.
A well-installed holder enhances bathroom functionality. Now, you can enjoy a tidy space. Regular maintenance ensures it stays secure. Share these tips with friends to help them too. Happy installing!

