Disclosure: This post contains affiliate links and I will be compensated if you make a purchase after clicking through my links. Learn More
Measuring plumbing fittings is crucial. Accurate measurements ensure a perfect fit and prevent leaks.
Understanding how to measure plumbing fittings can save you time and money. Whether you’re fixing a leaky faucet or installing a new sink, knowing the right measurements is essential. This guide will help you understand the different types of fittings and the tools needed.
It will also explain the steps to measure them correctly. Accurate measurements can make your plumbing projects easier and more efficient. Let’s dive into the basics of measuring plumbing fittings and avoid common mistakes.
Tools Required For Measurement
Measuring plumbing fittings is crucial for any installation or repair project. Accurate measurements ensure compatibility and proper function. Different tools are essential for precise measurements. Some accessories make the task easier and more efficient. Knowing what to use can save time and avoid errors.
Essential Measuring Tools
A tape measure is a basic tool for measuring fittings. It provides the length of pipes and the distance between connections. Ensure your tape measure is marked clearly for easy reading.
Calipers are another essential tool. They measure the diameter of pipes and fittings. Digital calipers offer precise readings and are easy to use. They help in obtaining accurate inner and outer diameters.
A ruler can be useful for smaller fittings. It helps measure shorter lengths with precision. A metal ruler is preferable for durability and accuracy.
Optional Accessories
Thread gauges are handy for measuring thread sizes. They help identify the correct fittings for threaded pipes. Using a thread gauge prevents mismatch issues.
A micrometer provides high precision measurements. It is useful for small diameter fittings. A micrometer ensures exactness where accuracy is critical.
Plumbing templates assist in planning layouts. They help visualize pipe routes and fitting placements. Templates are beneficial for complex installations.
Understanding Plumbing Fittings
Plumbing fittings are crucial in any plumbing system. They connect pipes and help control the flow of water. Understanding these fittings aids in proper installation and maintenance. It also ensures the correct measurement of plumbing fittings for any project. Knowing the types and materials of fittings is essential.
Types Of Fittings
There are various plumbing fittings. Each serves a specific purpose. Common types include elbows, tees, and couplings. Elbows change the direction of pipes. Tees split the flow into two directions. Couplings connect two pipes together. Each fitting is vital for different plumbing needs.
Common Materials
Plumbing fittings come in different materials. These include plastic, copper, and brass. Plastic fittings are lightweight and easy to install. Copper fittings are durable and resist corrosion. Brass fittings offer a balance of strength and flexibility. Choosing the right material ensures long-lasting plumbing systems.
Preparation For Measurement
Accurate measurement of plumbing fittings starts with proper preparation. Gather necessary tools like calipers, tape measure, and notepad. Ensure fittings are clean and dry before measuring.
Preparing to measure plumbing fittings is crucial for ensuring accurate results. Proper preparation can save you time and prevent costly mistakes. Here are the steps to get your fittings ready for measurement.
Cleaning The Fittings
Start by cleaning your fittings thoroughly. Dirt, grease, and grime can affect the accuracy of your measurements.
Use a soft cloth and some mild soap to wipe down each fitting.
For stubborn residue, a toothbrush can help get into tight spaces. Be sure to dry them completely to avoid any interference from moisture.
Inspecting For Damage
Next, inspect your fittings for any signs of damage. Even minor cracks or warping can skew your measurements.
Hold each fitting up to the light to check for hairline fractures.
If you find any damage, consider replacing the fitting. You don’t want to measure a damaged part and end up with inaccurate results.
Have you ever measured a fitting only to find out later it was damaged? It can be frustrating and a waste of time.
Taking a few minutes to inspect each fitting can save you from repeating the process.
So, always ensure your fittings are in good condition before you measure.

Credit: support.celestialfireglass.com
Measuring Diameter And Radius
To measure plumbing fittings, start by identifying the diameter and radius. Use a ruler or caliper for accuracy. Ensure measurements are in the correct units for best results.
Measuring the diameter and radius of plumbing fittings is essential for ensuring a correct fit and preventing leaks. Whether you’re a DIY enthusiast or a professional plumber, understanding how to accurately measure these components can save you time and frustration. But how exactly do you get these measurements right without guesswork?
###
Using A Caliper
A caliper is a highly accurate tool for measuring the diameter of plumbing fittings. Start by fully opening the caliper jaws. Place the fitting between the jaws, ensuring they grip the outer edges.
Gently tighten the jaws until they touch the fitting without compressing it. The caliper will display the measurement, usually in millimeters or inches. This tool is perfect for precision, especially when dealing with fittings that need an exact match.
But what if you don’t have a caliper on hand? Are there other ways to measure diameter effectively?
###
Alternative Methods
If you lack a caliper, don’t worry—other tools can provide accurate results. A simple tape measure can be a handy alternative. Wrap it around the circumference of the fitting, then divide the measurement by pi (approximately 3.14159) to find the diameter.
You can also use a ruler for smaller fittings. Place the fitting on a flat surface and align the ruler across the widest part. Read the measurement at the outer edges for the diameter.
For those who prefer digital solutions, various apps can calculate diameter using your smartphone’s camera. Have you ever tried using one of these apps for plumbing tasks? The results might surprise you with their accuracy!
Measuring plumbing fittings may seem straightforward, but precision is key. A small error can lead to a big mess down the line. So, next time you’re preparing for a plumbing project, double-check those measurements. Your future self will thank you.
Measuring Length And Depth
When tackling any plumbing project, understanding how to measure the length and depth of fittings is crucial. Accurate measurements ensure a snug fit and prevent leaks, saving you time and money. But how exactly do you go about measuring these aspects? Let’s break it down.
Depth Gauges
Depth gauges are incredibly useful tools for measuring the depth of a plumbing fitting. Imagine you’re replacing a faucet and need to know how deep the pipe goes. A depth gauge can slide right into the opening and give you an exact reading.
These gauges often feature a simple sliding mechanism that adjusts according to the depth of the fitting. You’ll want to ensure the gauge is clean and free from any debris to get an accurate measurement. Once you know the depth, it’s easier to choose the right fitting for your needs.
Tape Measures
Tape measures are versatile tools, perfect for measuring both the length and depth of plumbing fittings. They’re easy to use and most people already have one at home. Just pull out the tape and measure the length of the fitting from end to end.
When measuring depth, the tape measure can be placed inside the fitting. Just ensure it remains straight to avoid incorrect readings. Have you ever considered how a simple tape measure can prevent an ill-fitting pipe and future headaches?
Remember, whether you’re using a depth gauge or a tape measure, accuracy is key. Take your time and double-check your readings. The right tools and careful measurements make any plumbing job smoother and more successful. What’s the most challenging plumbing fitting you’ve had to measure?
Recording Measurements
Recording measurements is crucial in plumbing fittings. Accurate data ensures a proper fit and prevents leaks. This guide aids in capturing essential dimensions and organizing them effectively.
Noting Key Dimensions
Identify the type of fitting first. Then, measure its diameter. Use a caliper for precision. Note the internal and external diameters. Length is also crucial. Measure from end to end. Capture the thread size if applicable. Threads are vital for secure fittings. Record these dimensions clearly. Always double-check measurements for accuracy.
Organizing Data
Once measured, organize your data efficiently. Use a notebook or digital spreadsheet. List each fitting with its dimensions. Categorize them by type and size. Create columns for diameter, length, and thread size. Label each entry properly. Consistent formatting helps in quick referencing. Regularly update your records. This ensures you have the latest data at hand.
Common Measurement Mistakes
Measuring plumbing fittings accurately is crucial for successful installations. Many people make common mistakes during measurement, which can lead to improper fittings and costly repairs. Understanding these errors can save time and prevent future issues.
Avoiding Parallax Error
Parallax error occurs when you view the measuring tool at an angle. This can cause incorrect readings. Always position your eyes directly above the measurement markings. This ensures accuracy. Use a straight edge for guidance if needed. Keep the tool level for best results.
Ensuring Consistent Pressure
Consistent pressure is key when measuring flexible materials. Uneven pressure can distort the fitting size. Apply uniform force across the measuring tape or caliper. This prevents skewed measurements. Check that the tool isn’t bent or misshapen. A reliable tool provides accurate readings.
Credit: www.qchydraulics.com
Tips For Accurate Measurement
Accurate measurement of plumbing fittings is essential for a successful project. Miscalculations can lead to leaks and costly repairs. Here are some tips to ensure precise measurements. Follow these to avoid common mistakes.
Double-checking Results
Always double-check your measurements. Use a reliable measuring tape or tool. Measure twice to confirm accuracy. This simple step prevents errors. Record each measurement clearly. Keep a record for reference.
Consulting Professionals
Sometimes, professional advice is needed. Consult a plumber for complex fittings. They provide valuable insights. Experts can spot potential issues. Their experience ensures precision. It can save time and money.
Applications Of Accurate Measurements
Measuring plumbing fittings accurately ensures a proper fit and prevents leaks. Begin by identifying the type of fitting. Use a ruler or measuring tape to determine its diameter and length. This ensures compatibility with pipes and other fixtures, maintaining the integrity of plumbing systems.
Accurate measurements in plumbing are crucial for ensuring a smooth and efficient operation. Whether you’re replacing a fitting or designing a new system, precision is key to avoiding leaks, ensuring proper flow, and maintaining safety. How do precise measurements influence your plumbing projects, and why should they matter to you?
Fitting Replacement
When replacing a fitting, accurate measurements can save you time and frustration. Imagine standing in the hardware store, unsure if you’re about to buy the right-sized elbow joint.
Getting it wrong means another trip back, wasting both time and fuel. Precise measurements ensure you purchase the correct fittings, avoiding unnecessary returns or adjustments. Always measure the diameter, length, and thread type to ensure a seamless replacement.
System Design
Designing a plumbing system requires meticulous attention to detail. Each fitting must integrate perfectly into the overall layout, ensuring optimal flow and pressure.
If your measurements are off, it could lead to weak water pressure or even burst pipes. Consider sketching your design and marking precise dimensions before starting. This approach not only simplifies the process but also reduces the likelihood of costly mistakes.
Accurate measurements aren’t just numbers; they’re a blueprint for success in your plumbing projects. How could improving your measuring skills enhance your next project?

Credit: www.qcssproducts.com
Frequently Asked Questions
How Do You Measure The Size Of A Pipe Fitting?
Measure pipe fittings by their inside diameter. Use a caliper or ruler for accuracy. Consider pipe schedule for thickness.
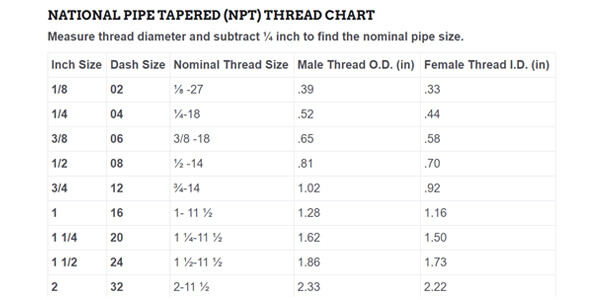
How Do You Tell What Size An Fittings Are?
Use a caliper or ruler to measure the outer diameter of the fitting’s threads. Check the size chart to match measurements.
How To Measure Plumbing Fittings With A Tape Measure?
Use a tape measure to find the fitting’s diameter by measuring across its widest part. Record the measurement in inches or millimeters for accuracy. Measure both the inner and outer diameters to ensure proper sizing. Double-check measurements for precision.
Are Pipe Fittings Measured From The Inside Or Outside?
Pipe fittings are usually measured from the inside diameter. This is known as the nominal pipe size.
Final Words
Measuring plumbing fittings doesn’t need to be complicated. Use simple tools. Understand the fitting types and sizes. Check the diameter and length accurately. Always double-check your measurements. This ensures proper fitment. Wrong measurements can cause leaks or damage. Practice these steps regularly.
You’ll gain confidence over time. Proper measurements save money and time. They also prevent potential repairs. Remember, patience is key. Take your time and measure carefully. Reliable fittings lead to efficient plumbing systems. Happy plumbing!

