Disclosure: This post contains affiliate links and I will be compensated if you make a purchase after clicking through my links. Learn More
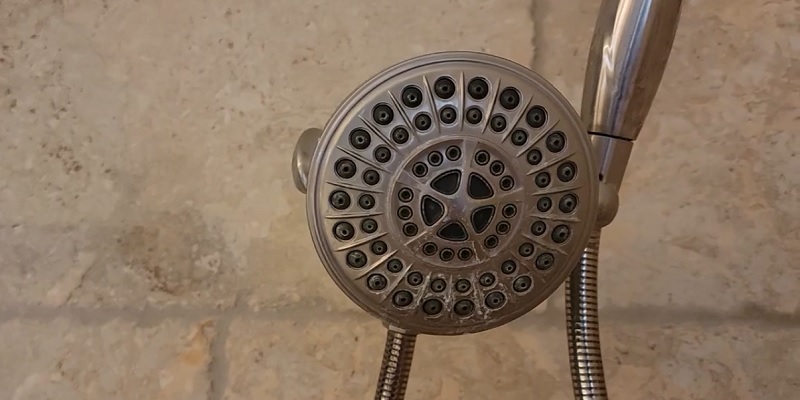
Cleaning shower head rubber nozzles is simple and important. It helps maintain water flow and hygiene.
Shower heads often collect mineral deposits and grime. This affects water pressure and cleanliness. Regular cleaning ensures your shower works well and stays sanitary. In this guide, we’ll show you easy steps to clean those rubber nozzles. With basic household items, you can keep your shower head in top condition.
Follow along for a quick and effective cleaning method. Your shower will thank you!
Importance Of Clean Shower Heads
Keeping your shower head clean is crucial for maintaining a healthy home environment. You might not think about it often, but over time, mineral deposits and grime can build up on your shower head rubber nozzles, affecting both your health and shower performance. Regular cleaning helps prevent these issues, ensuring you enjoy a refreshing shower every day.
Health Benefits
Dirty shower heads can harbor bacteria and mold, which can be harmful to your health. Imagine taking a shower thinking you’re getting clean, but you’re actually exposing yourself to germs. By cleaning your shower head regularly, you protect yourself and your family from potential health risks.
Think about the last time you felt a bit sniffly after a shower. It could be more than just the cold weather. Ensuring your shower head is clean minimizes the chances of inhaling any unwanted microorganisms.
Enhanced Water Flow
A clogged shower head can lead to weak water flow, turning your invigorating shower into a frustrating experience. Cleaning the rubber nozzles can restore the water pressure, making each shower feel like a spa day.
Picture your morning routine: you step into the shower expecting a powerful stream of water, but instead, you get a trickle. Fixing that is simpler than you think. A clean shower head lets you enjoy every drop, maximizing your shower experience.
Have you ever wondered why some showers feel different? It’s often about the water flow. Cleaning your shower head can make a noticeable difference, transforming your showering experience into something much more satisfying.
Regular maintenance of your shower head not only keeps you healthy but also enhances your daily comfort. So, when was the last time you cleaned your shower head? It might be time to give it a little attention.
Common Issues With Shower Head Nozzles
Cleaning your shower head’s rubber nozzles might seem like a mundane task, but it’s essential for maintaining a consistent water flow. Over time, you might notice some common issues that can disrupt your shower experience. Let’s dive into two major problems you might face.
Clogging Problems
Clogging can significantly reduce water pressure. This happens when debris and sediments from your water supply accumulate in the nozzles. Have you noticed water spraying in odd directions? That’s a classic sign of clogging.
I remember once stepping into the shower only to be met with a disappointing trickle of water. It was frustrating, especially on a chilly morning. After a quick inspection, I found tiny particles lodged in the nozzles. A simple clean-up restored my shower to its former glory.
To tackle clogging, use a needle or a toothpick to gently poke through the nozzles. This will dislodge the debris and restore proper water flow. It’s a quick fix that can save you from a dismal shower experience.
Mineral Buildup
Mineral buildup is another common issue, especially if you have hard water. Minerals like calcium and lime can deposit on the nozzles, creating a crusty layer. This not only affects the water pressure but also the spray pattern.
Imagine expecting a soothing spray and getting a weak, uneven trickle instead. Annoying, right? Mineral buildup is often the culprit. You can usually see the white, chalky deposits around the nozzle openings.
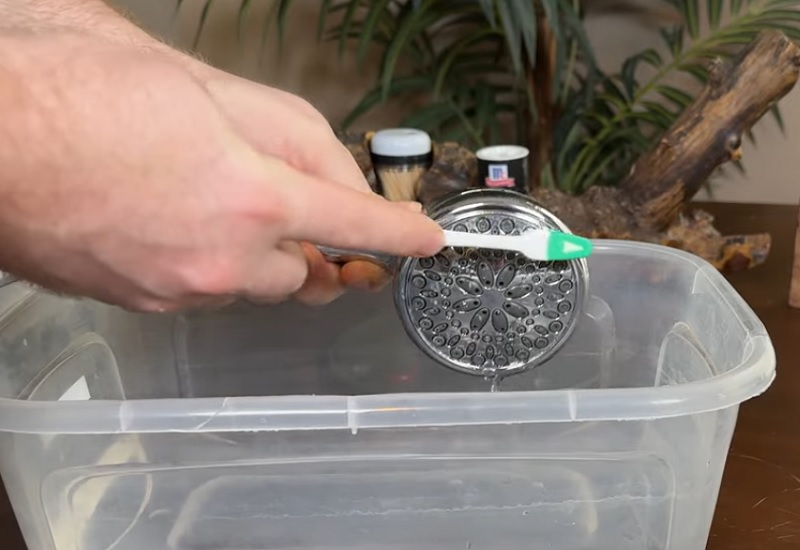
To clean mineral buildup, soak the shower head in a vinegar solution for a few hours. Vinegar is great at breaking down these deposits. After soaking, gently scrub the nozzles with an old toothbrush to remove the loosened minerals. This method is effective and doesn’t require any special cleaners.
Have you ever tried cleaning your shower head nozzles? What methods worked best for you? Share your experiences in the comments below. Your insights could help someone else enjoy a better shower!
Essential Cleaning Tools
Cleaning shower head rubber nozzles is easy with vinegar and a toothbrush. Soak the nozzles in vinegar to loosen mineral buildup. Gently scrub with a toothbrush for a sparkling clean finish.
Cleaning your shower head rubber nozzles can be a surprisingly rewarding task. Not only does it improve your water flow, but it can also extend the life of your shower head. To do this job right, having the right tools on hand is essential. You may think you can get away with just a cloth, but adding a few specific items can make the process quicker and more effective.
Required Equipment
To start, you’ll need a few basic items. A soft-bristle toothbrush can be your best friend. It’s perfect for scrubbing out mineral deposits without damaging the nozzles.
White vinegar is a go-to cleaning agent for its natural ability to break down limescale. Fill a plastic bag with vinegar and secure it around the shower head using a rubber band.
You’ll also need a small cloth or sponge to wipe down the exterior of the shower head. These simple tools are often enough to tackle the grime and buildup.
Optional Add-ons
If you’re looking to up your cleaning game, consider some optional add-ons. Baking soda can be mixed with vinegar to create a powerful cleaning paste. This combination can tackle stubborn deposits that refuse to budge.
A toothpick or a needle can be helpful for poking through particularly clogged nozzles. Just be careful not to puncture the rubber!
Finally, a small wrench may be necessary if you want to completely detach the shower head for a more thorough cleaning. Just make sure to cover the shower head with a cloth to prevent scratches.
Have you ever noticed how a little extra effort can make cleaning more satisfying? Imagine the water flowing freely again, as if you just installed a new shower head. That’s the kind of result these tools can help you achieve.
What tools do you usually use for cleaning around the house? You might already have some of these items on hand, ready to make your shower head sparkle.
Preparing For Cleaning
Cleaning shower head rubber nozzles ensures better water flow. Start by soaking the shower head in white vinegar. Gently scrub the nozzles with a toothbrush to remove residue.
Preparing to clean your shower head rubber nozzles might sound like a mundane task, but it’s actually a crucial step in maintaining a fresh and powerful shower experience. Over time, mineral deposits and grime can clog those tiny nozzles, reducing water flow and even causing uneven spray patterns. Before diving into the cleaning process, it’s essential to set the stage properly. A well-prepared cleaning session can save you time and ensure your shower head functions like new.
Safety Precautions
Before you start, think about safety. Protect your eyes and skin from any cleaning agents you plan to use. Wearing gloves is a smart choice, especially if you have sensitive skin or are using stronger cleaning solutions. Remember to ventilate the bathroom well—open a window or turn on the fan to avoid inhaling any fumes.
Initial Steps
Start by gathering your supplies. You’ll need a soft cloth, a toothbrush, white vinegar, a plastic bag, and a rubber band. If you’ve ever had a frustrating moment where you couldn’t find what you needed mid-task, you’ll appreciate having everything ready from the get-go.
Turn off the water supply to the shower head. This may seem obvious, but it’s a step easily overlooked in the eagerness to get started. Imagine the surprise of being unexpectedly soaked! Additionally, check if your shower head is easily detachable. If it is, removing it might make the cleaning process more thorough. However, if it’s fixed, don’t worry—you can still clean it effectively with the right technique.
Preparation is key. Have you ever tried to bake a cake without gathering your ingredients first? It can be chaotic. The same principle applies here. With your supplies ready and safety precautions in place, you’re set to clean those rubber nozzles with ease and efficiency.
Cleaning With Vinegar
Easily clean shower head rubber nozzles by soaking them in a vinegar solution. This removes mineral buildup and restores water flow. Gently scrub any remaining residue with a toothbrush for sparkling results.
Cleaning a shower head with vinegar is easy and effective. Vinegar, a natural cleaner, can dissolve mineral deposits. This method keeps your shower flowing smoothly. Learn the simple steps below.
Soaking Process
Start by removing the shower head. Fill a plastic bag with white vinegar. Submerge the shower head in the bag. Secure it with a rubber band. Leave it to soak for several hours. Overnight works best for tough build-up. The vinegar will break down the deposits.
Scrubbing Techniques
After soaking, remove the shower head. Use a toothbrush to scrub the nozzles. Focus on each rubber nozzle carefully. Gently scrub to avoid damage. Rinse the shower head with warm water. Check for any remaining deposits. Repeat the process if needed. Reattach the shower head once clean. Enjoy a refreshing shower with improved water flow.
Using Baking Soda For Stubborn Stains
Using baking soda is a simple way to clean stubborn stains on shower head rubber nozzles. Shower heads can accumulate mineral deposits and grime over time. Baking soda acts as a gentle abrasive, helping to remove these stains effectively. It’s a natural cleaner that won’t damage the rubber nozzles. It’s also safe for the environment and non-toxic. This method is ideal for those seeking an easy, eco-friendly cleaning solution.
Mixing The Solution
Start by mixing baking soda with water. Use equal parts to create a paste. The paste should be thick enough to stick to the rubber nozzles. If it’s too runny, add more baking soda. This mixture is your cleaning solution. It will help scrub away stubborn stains. You can make more if needed, depending on the size of your shower head.
Application Methods
Once your paste is ready, apply it to the rubber nozzles. Use an old toothbrush for this task. A toothbrush helps reach into small spaces. Gently scrub the nozzles with the paste. Focus on areas with visible stains. Allow the paste to sit for 15 minutes. This gives the baking soda time to work. Rinse the shower head thoroughly with water. Check for any remaining stains. Repeat the process if necessary.
Rinsing And Reassembling
Gently remove the shower head and rinse the rubber nozzles under warm water. Reassemble the parts carefully, ensuring everything fits snugly. Regular cleaning helps prevent clogs and maintain water flow.
Cleaning shower head rubber nozzles can enhance water flow. Proper rinsing and reassembling ensure the shower head works efficiently. After removing the build-up, rinsing the nozzles is crucial. This step ensures every particle is washed away, leaving no residue.
Proper Rinsing
Rinse each nozzle thoroughly with warm water. This helps remove any remaining debris. Ensure the water runs smoothly through each nozzle. Hold the shower head under running water for effective rinsing. Rotate the shower head to cover all angles. Check for any lingering particles and rinse again if necessary.
Reattachment Tips
Reattaching the shower head requires care. Align the nozzles correctly to avoid leaks. Ensure all parts fit snugly without forcing them. Tighten any screws or fasteners gently. Use a cloth to protect delicate surfaces while tightening. Test the shower head for any leaks after reassembly. Adjust as needed to ensure a perfect fit.
Maintenance Tips
Clean shower head rubber nozzles by soaking them in white vinegar. Gently scrub with a toothbrush to remove buildup. Rinse thoroughly with water.
Keeping your shower head rubber nozzles in pristine condition doesn’t just ensure a steady water flow; it also prolongs the life of your shower head. Maintaining these small but essential parts can prevent buildup and blockages that compromise your shower experience. Whether you’re a cleaning enthusiast or someone who only notices the shower head when it clogs, these maintenance tips can make a difference.
Regular Cleaning Schedule
Setting a regular cleaning schedule is key to preventing mineral buildup on rubber nozzles. Aim to clean your shower head nozzles at least once a month. A simple solution of equal parts vinegar and water can help dissolve mineral deposits effectively.
Just soak the shower head in this solution for a few hours or overnight, depending on the severity of buildup. You’ll be amazed at how this simple routine can save you from the frustration of uneven water flow.
Preventive Measures
Preventing problems before they start can save you time and hassle. Consider installing a water softener if you live in an area with hard water. This can significantly reduce mineral deposits in your shower head and other fixtures.
Additionally, wiping down your shower head with a cloth after each use can minimize buildup. Do you ever think about the water residue left behind after each shower? Taking a minute to dry the shower head can make a huge difference over time.
By maintaining a regular cleaning schedule and taking preventive measures, you ensure that your shower head performs optimally for years. Keep these tips in mind, and enjoy a more refreshing shower experience every day.
Frequently Asked Questions
Does Vinegar Really Clean A Shower Head?
Yes, vinegar effectively cleans a shower head by dissolving mineral deposits. Soak the shower head in vinegar overnight for best results. Rinse thoroughly with water afterward to remove any residue. This method is both natural and cost-effective, making it a popular choice for maintaining shower head cleanliness.
What Is The Black Stuff Coming Out Of My Shower Head?
The black stuff from your shower head is likely mold or mineral deposits. Regular cleaning can help prevent buildup.
How Do I Remove Buildup From My Shower Head?
To remove buildup from your shower head, soak it in vinegar overnight. Rinse thoroughly with water. For tough buildup, scrub with a toothbrush. Reattach the shower head and run water to clear any remaining residue. Regular cleaning prevents future buildup.
How Do You Clean A Shower Head Flow Restrictor?
Remove the shower head. Locate the flow restrictor. Soak it in vinegar for an hour. Scrub gently with a brush. Reassemble and test.
Final Words
Cleaning shower head rubber nozzles keeps water flowing smoothly. Regular maintenance prevents mineral buildup and ensures clean water. Simple steps can make a big difference. Use vinegar and a toothbrush for effective cleaning. Remove buildup easily with these tools. The process is quick and hassle-free.
Enjoy a better shower experience with clean nozzles. Fresh water feels great and is healthier. Keep your shower head in top shape with these tips. It’s easy and worth the effort. Regular cleaning extends the life of your shower head.
A little care makes a big impact.

