Disclosure: This post contains affiliate links and I will be compensated if you make a purchase after clicking through my links. Learn More
Venting a kitchen sink under a window can seem challenging. It’s possible with the right steps.
Proper ventilation is crucial for any kitchen sink. It ensures smooth drainage and prevents odors. When the sink is under a window, space and placement can be tricky. You need to consider the layout and plumbing structure. This guide will help you understand the process.
We’ll explore the steps involved and provide tips for effective venting. Whether you’re a DIY enthusiast or planning to hire a professional, this information will be valuable. So, let’s dive into the details and learn how to vent a kitchen sink under a window efficiently.

Credit: terrylove.com
Tools And Materials Needed
Essential tools for venting a kitchen sink under a window include a pipe cutter, adjustable wrench, and plumber’s tape. Materials like PVC pipes, vent fittings, and pipe cement are also required. Proper preparation ensures a smooth installation process.
Venturing into the world of home improvement can be both exciting and daunting, especially when you’re tackling a project like venting a kitchen sink under a window. The key to success lies in knowing what tools and materials you’ll need before you dive in. This ensures you’re not left scrambling in the middle of the project. Let’s explore the essential tools and required materials that will make your task smoother and more efficient.
Essential Tools
Having the right tools at your fingertips can make all the difference. You’ll need a pipe cutter for precisely cutting pipes to fit your layout. An adjustable wrench is crucial for tightening and loosening nuts and bolts, ensuring a snug fit for your plumbing connections. Consider investing in a plumber’s snake to clear any blockages in the pipes. A level is indispensable to check that your pipes are installed straight and true. If you’ve ever tried to eyeball it, you know how tricky that can be!
Additionally, a drill with various bits will come in handy for making holes in cabinets or walls. Safety goggles are a must to protect your eyes from debris during drilling and cutting. Do you have all these tools in your toolbox?
Required Materials
When it comes to materials, you’ll need a few essentials to complete the venting process. PVC pipes are commonly used in plumbing for their durability and ease of installation. Ensure you have the right diameter to fit your sink and vent system. Pipe fittings, such as elbows and tees, are necessary for connecting pipes and ensuring proper flow direction.
You can’t forget the PVC primer and cement. This duo is essential for creating watertight seals between pipe connections. Hangers and straps will help you secure pipes in place, preventing unwanted movement or sagging. Sealant or caulking is vital for sealing any gaps or openings around the window area, keeping moisture out.
Consider insulation for your pipes if your kitchen is prone to temperature changes. This can prevent freezing and potential damage. Which of these materials do you already have on hand?
Approaching this project with the right tools and materials is like setting off on a well-planned journey. It minimizes hiccups and helps you stay focused on achieving the perfect venting setup for your kitchen sink. Are you ready to start your next DIY adventure?
Planning The Venting System
Venting a kitchen sink under a window requires careful planning. A well-thought-out venting system ensures proper drainage and prevents bad odors. Let’s break down the steps to plan this system effectively.
Assessing The Space
First, look at the space under the window. Measure the distance between the sink and the wall. Check for any obstructions that might interfere with the vent pipe. Make sure there is enough room to install the vent without disturbing the window structure.
Choosing The Vent Type
Next, decide which type of vent to use. There are several options, including a standard vent, a loop vent, or an air admittance valve (AAV). Each has its pros and cons. A standard vent usually runs vertically through the roof. A loop vent goes around the sink and connects to the drain. An AAV allows air to enter the drain without a roof vent.
Choose the one that fits your space and meets local plumbing codes. Consult with a plumber if needed. They can help you understand which vent type is best for your situation.
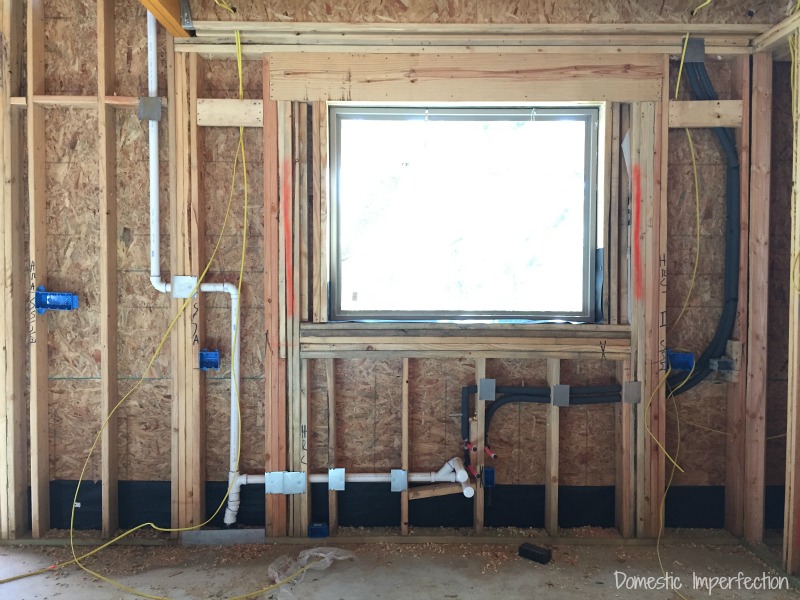
Installing The Vent Pipe
Installing a vent pipe for a kitchen sink under a window requires careful planning. Ensure proper alignment with existing plumbing. This helps maintain efficiency and avoids any blockages.
Installing a vent pipe under a kitchen sink, especially one positioned beneath a window, can seem daunting. Yet, it’s a task you can tackle with some planning and the right tools. The key is to ensure that the vent pipe is properly installed to facilitate smooth drainage and prevent unpleasant odors from creeping into your kitchen.
Measuring And Cutting The Pipe
Begin by measuring the distance from your sink drain to the planned location of the vent pipe. Accurate measurements are critical; even a small error can lead to leaks or improper venting. Use a tape measure and jot down your findings.
Once you’ve measured, it’s time to cut the pipe. Use a hacksaw for a clean cut. Make sure to wear safety goggles to protect your eyes from flying debris.
Double-check your cuts before proceeding to the next step. A well-measured and cut pipe will save you time and headaches later.
Connecting To Existing Plumbing
Connecting the vent pipe to your existing plumbing system requires attention to detail. Identify the closest point to connect the new vent pipe. This is usually near the P-trap under your sink.
Use a T-fitting to make the connection. Ensure that all joints are tight and secure to prevent leaks. Hand-tighten the connections and then use a wrench for an extra turn.
Test the connection by running water through the sink. Check for any leaks and tighten any loose fittings. Are you noticing any issues? A small leak can turn into a bigger problem if not addressed immediately.
Installing a vent pipe may seem challenging, but breaking it into manageable steps makes it achievable. Have you ever faced a plumbing task that seemed impossible at first? With patience and precision, you can handle this project and enhance your kitchen’s functionality.
Securing The Vent Pipe
Securing the vent pipe for a kitchen sink under a window is crucial. It ensures proper ventilation and prevents odors. Proper installation helps in maintaining the efficiency of the plumbing system. Focus on the right methods to keep the vent pipe secure. This ensures a well-functioning kitchen sink setup.
Mounting The Pipe
Begin by selecting the right location for the vent pipe. Use a stud finder to locate studs in the wall. Mount the pipe securely between these studs. This prevents movement and ensures the pipe stays in place. Use brackets or pipe straps for mounting. These tools provide firm support to the vent pipe.
Ensuring Stability
Stability is key for a vent pipe under a window. Check for any loose connections and tighten them. Use pipe clamps to secure the pipe at regular intervals. This prevents sagging and maintains the pipe’s alignment. Ensure the vent pipe is free from obstructions. Regular checks will keep the system efficient and odor-free.
Sealing And Insulating
Properly venting a kitchen sink under a window ensures efficient water flow and prevents odors. Use a loop vent or an air admittance valve for effective ventilation.
Sealing and insulating your kitchen sink vent under a window is crucial for maintaining energy efficiency and preventing moisture damage. Proper sealing ensures that no drafts enter your kitchen, keeping your space warm in winter and cool in summer. Insulation, on the other hand, helps to maintain the temperature and prevents condensation buildup, which could lead to mold and mildew. It’s essential to get these steps right to keep your kitchen functioning optimally and looking great.
Applying Sealant
Choosing the right sealant can make all the difference. Silicone sealants are a popular choice because they are waterproof and flexible, making them ideal for kitchen environments. Start by cleaning the area around the vent thoroughly, removing any old sealant or debris.
Apply the sealant using a caulking gun, ensuring an even and continuous bead around the vent. Smooth it out with a damp finger or a caulking tool for a neat finish. Let it dry as per the manufacturer’s instructions. A well-sealed vent keeps out unwanted air and moisture, protecting your kitchen from potential damage.
Adding Insulation
Insulating the space around your kitchen sink vent is the next critical step. Use foam pipe insulation or fiberglass insulation to fill any gaps. These materials are both effective and easy to work with.
Cut the insulation to fit snugly around the vent pipes. Secure it with insulation tape to ensure it stays in place. Proper insulation not only helps in maintaining the kitchen’s temperature but also reduces noise from the plumbing.
Have you ever noticed a cold draft or condensation around your kitchen window? With effective sealing and insulation, those issues can become a thing of the past. Focusing on these details can enhance your kitchen’s comfort and efficiency, making it a more enjoyable space to cook and gather in.
Testing The Venting System
Installing a venting system for a kitchen sink under a window requires careful placement. Ensure the vent pipe runs vertically to optimize airflow. This setup prevents clogs and odors, maintaining a clean environment.
Testing the venting system of your kitchen sink under a window is a crucial step to ensure everything works seamlessly. After all the hard work of installing the pipes and connecting the vents, you need to verify that your setup is functional and efficient. Let’s explore how you can check for leaks and ensure proper airflow, guaranteeing your kitchen remains a pleasant space free from unwanted odors.
Checking For Leaks
Begin by running water through the sink. Observe the connections and pipes closely. Look for any signs of moisture or dripping.
Use a flashlight to inspect hard-to-reach areas. Sometimes, leaks can be sneaky, hiding in corners you might overlook.
If you find a leak, tighten the joints or replace faulty parts immediately. A leak today can be a major problem tomorrow.
Ensuring Proper Airflow
Airflow is vital to prevent sewer gases from entering your kitchen. Check the vent pipes for obstructions.
Feel the air near the vent openings. Is there a slight breeze? If not, the airflow might be compromised.
Consider the placement. Is the vent positioned to allow unrestricted airflow? Rearrange if necessary to improve function.
Testing your venting system is more than just a task—it’s about ensuring the heart of your home stays comfortable and healthy. Have you ever wondered how a minor oversight in plumbing could impact your daily routine? Don’t let a small issue turn into a big headache. Take these steps seriously and enjoy a worry-free kitchen environment.
Common Mistakes To Avoid
Venting a kitchen sink under a window can be tricky. Avoid common mistakes for a smooth installation. These errors can lead to costly repairs later.
Incorrect Pipe Sizing
Many choose wrong pipe sizes. This mistake affects water flow. It can cause blockages and backups. Use pipes that match your sink’s requirements. Measure carefully before purchasing materials. Proper sizing prevents future issues.
Improper Connections
Pipes must connect correctly. Incorrect connections lead to leaks. Leaks damage cabinets and floors. Ensure all joints fit snugly. Use the right fittings for your setup. Double-check each connection before use. Secure connections save time and money.
Maintenance Tips
Maintaining your kitchen sink’s vent is crucial to ensure it functions efficiently, especially when positioned under a window. Regular care not only prevents clogs and unpleasant odors but also extends the lifespan of your plumbing system. Let’s dive into some practical maintenance tips that can save you time and hassle down the road.
Regular Inspections
Checking your sink vent regularly is essential. This simple habit can help you spot potential problems before they escalate. You might be wondering how often you should do this. Aim for a monthly inspection.
Look for any visible signs of wear or damage. Are there cracks or leaks? Even a small crack can lead to bigger issues if left unattended. It’s like spotting a tiny leak in a bicycle tire; it’s best to patch it up before it becomes a flat.
During inspections, pay attention to any unusual smells. A foul odor can indicate a blockage in your vent. It’s your nose’s way of saying something isn’t quite right. Don’t ignore it.
Cleaning The Vent
Cleaning your kitchen sink vent can sound daunting, but it’s easier than you think. Regular cleaning prevents buildup and keeps your plumbing running smoothly. Start by removing any debris around the vent.
Use a brush or a pipe cleaner to scrub inside the vent. This helps remove any stubborn grime or residue that might be lurking. Think of it as brushing your teeth; regular cleaning prevents decay.
Consider using a mixture of vinegar and baking soda. This natural solution is effective for cleaning and deodorizing. Pour it into the vent and let it sit for a few minutes before rinsing with hot water. It’s like giving your vent a spa day.
Have you ever neglected a small maintenance task only to face a bigger problem later? Keeping your sink vent clean can prevent such headaches. Why wait for a costly repair when a little cleaning can do the trick?
By focusing on regular inspections and cleaning, you ensure your kitchen sink vent remains in top condition. These straightforward steps can make a significant difference in your kitchen’s functionality and your peace of mind.
Credit: www.plbg.com
Frequently Asked Questions
How To Vent Sink Drain Under Window?
Install a vent pipe that runs horizontally under the window. Connect it to the main vent stack to ensure proper drainage.
How Should A Kitchen Sink Be Vented?
Venting a kitchen sink requires installing a vent pipe connected to the drain line. This allows proper air flow, preventing suction and ensuring water drains smoothly. Use a standard vent or an air admittance valve (AAV) as needed. Consult a plumber for specific installation requirements and local code compliance.
What Is The Downside Of The Air Admittance Valve?
Air admittance valves can sometimes fail, causing sewer gases to enter the building. Regular maintenance is required to ensure functionality. Read here air admittance valve problems and solutions.
Can You Put A Sink Under A Window?
Yes, you can install a sink under a window. Ensure proper plumbing and ventilation. Consider window height and faucet clearance for functionality. It offers natural light and a pleasant view, enhancing kitchen aesthetics.
Final Words
Venting a kitchen sink under a window is straightforward. It requires careful planning and the right tools. Start by assessing the space available. Ensure the vent pipe is correctly installed. This prevents plumbing issues. Always follow local building codes. They ensure safety and efficiency.
Consider consulting a professional if unsure. Proper venting improves kitchen function. It also enhances air quality. You can enjoy a well-ventilated kitchen space. With these tips, you’re ready to tackle the task. Your kitchen sink will work better and last longer.

