Disclosure: This post contains affiliate links and I will be compensated if you make a purchase after clicking through my links. Learn More
Got a clogged toilet? A toilet auger can help!
This tool is perfect for clearing stubborn blockages. In this guide, we’ll show you how to use a toilet auger effectively. You’ll learn step-by-step instructions, ensuring you can tackle this common household issue with confidence. Toilets can get clogged for various reasons, from too much toilet paper to foreign objects.
An auger can reach deep into the drain, breaking up or pulling out blockages. By mastering this tool, you can save money on plumber visits and quickly resolve toilet clogs. Ready to dive in? Let’s get started!
:max_bytes(150000):strip_icc()/how-to-use-a-toilet-auger-2719038-Hero-9fed37f3e59042cab0f9d7b7cc372ac0.jpg)
Credit: www.thespruce.com
Choosing The Right Toilet Auger
Choosing the right toilet auger is crucial for effective plumbing. A good auger clears clogs quickly and prevents future issues. You need to understand the types and features to make an informed choice.
Types Of Toilet Augers
Toilet augers come in various types. The standard auger is basic and affordable. It is suitable for minor blockages. Heavy-duty augers are stronger and more durable. They handle tough clogs with ease. Electric augers are advanced and efficient. They provide a quick solution but cost more.
Features To Consider
Consider the length of the auger. Longer augers reach deeper clogs. A flexible cable is important for maneuverability. Look for a rust-resistant material. It ensures the auger lasts longer. A comfortable handle is essential. It makes the auger easy to use. Ensure the auger fits your toilet bowl. This prevents damage during use.
Credit: kk.org
Preparing To Use The Auger
Getting ready to tackle a clogged toilet? Gather your toilet auger and ensure it’s clean and undamaged. Position the tool carefully to avoid scratching the bowl, then turn the handle gently for effective use.
Preparing to use a toilet auger ensures a smoother process. This preparation involves gathering the right supplies and taking safety precautions. With careful preparation, the task becomes less daunting. Below, find steps to get ready efficiently.
Gathering Supplies
Before starting, gather all necessary tools. You will need a toilet auger and rubber gloves. A bucket and old towels can also be helpful. These items will make the task easier and cleaner.
Ensure the auger is the right size for your toilet. Check the tool for any damage or rust. A well-maintained auger works more efficiently.
Safety Precautions
Safety is crucial when using an auger. Wear rubber gloves to protect your hands. They shield you from germs and dirt.
Ensure the bathroom is well-lit. Good lighting prevents accidents and helps you see clearly. Keep the floor dry to avoid slips.
Be gentle with the auger to prevent damage. Forcing it can harm the toilet bowl. Always follow the manufacturer’s instructions. This ensures safe and effective use.
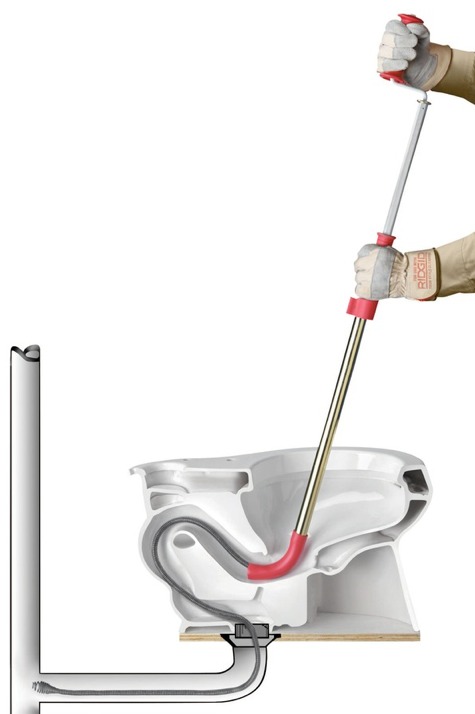
Inserting The Auger
To insert the auger, gently slide the flexible end into the toilet bowl. Guide it through the drain until you feel resistance. Carefully turn the handle, helping the auger snake through the clog.
Inserting the auger into the toilet bowl may seem daunting, but it is a straightforward process with a little guidance. It requires precision and care to ensure you don’t damage your toilet while effectively clearing the clog.
Positioning The Auger
First, you need to position the auger correctly. Hold the auger handle firmly and place the curved end into the toilet bowl. Make sure the tip is pointed towards the drain hole.
It’s essential to keep the auger steady to prevent scratching the porcelain. You might feel a slight resistance, but don’t force it; let the auger move naturally.
Guiding The Cable
Once the auger is positioned, begin guiding the cable. Slowly rotate the handle clockwise, which will extend the cable into the drain.
If you encounter resistance, gently pull back a bit, then continue rotating. The goal is to work through the clog without pushing too hard.
As you guide the cable, keep an eye on the handle movement. If it suddenly becomes easier to rotate, you might have broken through the clog.
Remember, patience is key. Rushing can lead to damage or ineffective clearing. Have you ever had a toilet clog that seemed impossible to clear? This method can save you from the hassle of calling a plumber.
By following these steps for inserting the auger, you’ll likely resolve your clog efficiently and safely.
Clearing The Clog
Easily clear toilet clogs using a toilet auger. This tool reaches deep into pipes, removing blockages effectively. Keep bathrooms functional and hygienic with this simple method.
Clearing a clog in your toilet can feel like a daunting task. But with the right tools and techniques, it’s something you can handle with confidence. A toilet auger is a handy device designed specifically for this job. It’s more effective and sanitary than other methods. Let’s dive into how you can use a toilet auger to clear that pesky blockage.
Rotating The Auger
Begin by inserting the auger into the toilet bowl. Ensure the curved end is facing the drain. This positioning helps guide the auger down the toilet’s bend.
Now, grip the handle firmly. Begin rotating the auger’s crank in a clockwise direction. This motion allows the cable to extend into the toilet’s drain, seeking out the clog.
Keep the auger steady as you rotate. It’s important to maintain control to prevent scratching the toilet bowl. Have you ever considered how much easier it becomes when you remain calm and methodical?
Breaking Up The Blockage
Once the auger reaches the blockage, you’ll feel resistance. Don’t panic; this is a good sign. It means the auger is doing its job.
Continue to rotate the auger while gently pushing it forward. This action helps break up the clog into smaller pieces, allowing it to move through the drain.
If the resistance lessens, the blockage is likely breaking apart. You might hear the sound of water starting to drain. Isn’t it satisfying to know you’re solving the problem with your own hands?
If the clog persists, retract the auger slightly and push forward again. Sometimes a little patience and persistence are all that’s needed. Have you noticed how rewarding it is to overcome challenges with just a bit of effort?
Have you ever used a toilet auger before? How did it go? Share your experiences or any tips you might have for others facing a stubborn clog.
Removing The Auger
Easily remove the auger by pulling it out after unclogging the toilet. Twist gently to release it smoothly. Ensure cleanliness by wiping the auger before storing it.
Removing the auger from the toilet can seem daunting, but it’s crucial for completing the unclogging process. Once the blockage is cleared, your next step is to safely retract and remove the auger to avoid any potential mess. You’ll want to do this efficiently to prevent any remnants of the obstruction from causing further issues. Let’s dive into the steps of retracting the cable and disposing of debris.
Retracting The Cable
Begin by slowly retracting the cable back into the auger.
Use a steady motion to prevent splashing or tangling.
If you’ve ever tugged too hard on a shoelace, you know how it can knot up. Keep the pace easy and controlled.
While retracting, pay attention to any resistance.
This could indicate leftover debris clinging to the cable.
Gentle wiggling can help dislodge any stubborn pieces.
Once fully retracted, inspect the cable.
Look for any debris or residue that might have been pulled up. A clean cable means a successful unclogging.
Disposing Of Debris
After the auger is retracted, you may notice debris on the cable or in the toilet bowl.
Use a disposable cloth or paper towel to clean the cable.
Wrap it around the cable and slide it down, collecting any residue.
Consider the debris you’ve removed.
Is it something you’ve flushed before, thinking it harmless?
This could be a moment to rethink what goes down your toilet.
Dispose of the debris in a trash bag or bin.
Avoid flushing it again, as this could risk another clog.
Your goal is to ensure the auger was worth the effort.
Finally, rinse the auger head and cable with water.
This prevents any leftover particles from drying and hardening.
Keep your tools ready for future use, free from remnants of past clogs.
These steps not only maintain your toilet auger but also keep your bathroom clean and functional. Have you ever wondered how much less stressful plumbing issues could be with the right tools and techniques?
Testing The Toilet
Once you’ve tackled the clog with a toilet auger, it’s time to see if your efforts have paid off. Testing the toilet is the crucial step to ensure everything is flowing smoothly. This process is straightforward but requires a bit of patience and attention to detail.
Flushing The Toilet
Start by flushing the toilet. This is the moment of truth. As you press down on the handle, watch the water level closely. Does it rise dangerously high, or does it settle back down quickly? A successful flush means your toilet auger has done its job. If not, it might be time to give it another go.
Remember, a single flush can reveal a lot. If you see swirling water but no drainage, there might still be a blockage lurking beneath. Sometimes, a second flush can push through any remaining debris.
Checking For Residual Clogs
Even if the flush seems successful, take a moment to double-check for residual clogs. Use a flashlight to peek into the bowl and ensure no remnants are left behind. If you spot anything suspicious, the toilet auger might need another round.
Consider using a bucket of water to test the drainage further. Pour it quickly into the bowl. Does it drain smoothly? If yes, you’re in the clear. If it hesitates, there might be a stubborn clog needing extra attention.
Your toilet might be clear now, but what if it clogs again soon? It’s worth pondering if there’s a habitual issue or if something keeps getting flushed that shouldn’t be. Reflect on what might be causing repeated clogs and take preventive measures.
Testing the toilet post-auger use isn’t just a task; it’s a chance to ensure your bathroom stays a hassle-free zone. With a little care and observation, you can keep everything flowing smoothly. Keep an eye out, and don’t hesitate to act if the toilet seems sluggish.
Maintaining Your Auger
Using a toilet auger effectively prevents clogs. Start by inserting the auger into the toilet bowl. Turn the handle to clear the blockage.
Maintaining your toilet auger ensures it stays in top condition, ready for any plumbing emergency. Regular upkeep not only extends its lifespan but also keeps it hygienic. Let’s dive into the essential steps to maintain your auger.
Cleaning The Auger
After every use, rinse the auger thoroughly with water. This prevents the buildup of any residual debris or unpleasant odors. Use a cloth or sponge to wipe down the cable and handle, ensuring all parts are clean.
Consider using a mild detergent if the auger has been used for a particularly messy clog. Just a few drops in warm water can do wonders. Rinse it well afterward to ensure no soap residue is left.
Dry the auger completely before storing it. Moisture can lead to rust, which will deteriorate the metal parts. Use a towel to wipe it down, or let it air dry in a well-ventilated area.
Storing The Auger
Store your auger in a dry, cool place. This prevents rust and other forms of damage. A tool shed or garage shelf works well.
Keep it coiled neatly to avoid tangling. This ensures it’s ready for quick use when you need it. A tangled auger can be frustrating to untangle in an emergency.
Consider hanging the auger if possible. Using hooks or wall mounts keeps it off the ground and reduces the risk of accidental damage. It also makes it easy to grab when you’re in a hurry.
Have you ever neglected a tool only to find it unusable when you needed it most? By taking these simple steps, you can ensure your toilet auger is always ready for action. Regular maintenance might seem tedious, but it saves time and money in the long run.
:max_bytes(150000):strip_icc()/how-to-use-a-toilet-auger-2719038-01-b04f9f1ffc2e43d49054c48e30214190.jpg)
Credit: www.thespruce.com
Troubleshooting Common Issues
Using a toilet auger can solve many plumbing issues. But sometimes, things don’t go as planned. Understanding common problems can help you fix them quickly. This section will guide you through tackling stubborn clogs and dealing with a stuck auger.
Stubborn Clogs
Stubborn clogs may need extra effort. First, ensure the auger’s cable is fully extended. Push it slowly into the toilet drain. If you feel resistance, turn the handle gently. This action helps break the blockage. Repeat this process several times. If the clog persists, consider using a plunger before trying the auger again.
Auger Gets Stuck
An auger can get stuck if twisted too tightly. Release the tension by turning the handle counterclockwise. This action should loosen the auger. Pull the auger back gently. Avoid using excessive force. If the auger remains stuck, check for any sharp objects in the drain. These objects can trap the auger and need careful removal.
Frequently Asked Questions
How Do You Unclog A Toilet With An Auger?
Insert the auger into the toilet bowl and crank the handle clockwise. Push gently until you feel resistance. Continue cranking to break up the blockage. Pull the auger out slowly, flushing the toilet to check if the clog is cleared.
Repeat if necessary for stubborn clogs.
When Should You Use A Toilet Auger?
Use a toilet auger when a plunger fails to clear a stubborn toilet clog. It’s effective for removing deeper blockages.
Is A Toilet Auger Better Than A Snake?
A toilet auger is better for clearing tough clogs in toilets. A snake works well for general drain issues. Choose based on your specific needs.
How Do I Know If My Toilet Auger Is Working?
A working toilet auger will clear blockages and allow water to flow freely. Listen for gurgling sounds.
Final Words
Using a toilet auger is simple and effective. Follow the steps carefully to avoid damage. A clean and clear toilet boosts hygiene. Practice makes perfect, so don’t get discouraged. Soon, you’ll handle clogs with ease. Keep your auger handy for future use.
Regular maintenance helps prevent major issues. Enjoy the confidence of a smoothly running bathroom. Remember, patience and practice pay off. With these tips, you can tackle clogs confidently. Happy unclogging!